When a Leaking Conservatory Becomes a Bigger Problem Than You Think
Conservatory flashing repair stops water from entering your home at the vulnerable junction where the conservatory roof meets the house wall. If you’ve noticed damp patches, ceiling stains, or dripping near that seam, a prompt inspection by a trusted roofing contractor can prevent a small leak from becoming rot, mold, and structural damage. Here’s what you need to know right away:
Quick Answer: How to Fix Leaking Conservatory Flashing
- Identify the leak source — inspect the joint where your conservatory roof meets the house wall
- Assess the damage — determine if resealing is enough or if flashing needs replacing
- Choose the right material — Code 4 lead, Ubiflex, or a uPVC composite system
- Remove old sealant and failed flashing completely before any repair
- Install new flashing mechanically into the mortar chase — not just glued on top
- Test with water before considering the job done
Most minor repairs cost between £200 and £400. A full flashing replacement runs £400 to £1,200+ depending on materials and access. A properly done repair can last 10 to 20 years or more.
That drip you hear on a rainy day might seem minor. But water that gets behind a conservatory’s roof-to-wall junction doesn’t stay put — it travels. It soaks into timber frames, creeps behind plasterboard, and quietly causes rot, mold, and structural damage long before you see the worst of it. As roofing contractors, we’ve seen small, ignored leaks turn into costly structural repairs that could have been avoided with a straightforward fix.
The good news? In most cases, you don’t need a full roof replacement. Conservatory flashing failure is a specific, well-understood problem — and it has a clear, lasting solution.
I’m Carlos Yzaguirre, President of Apex Roofing & General Contractors, and over the years I’ve helped homeowners across San Antonio and beyond diagnose and resolve exactly this kind of water intrusion, including conservatory flashing repair on both residential and commercial properties. In this guide, I’ll walk you through everything you need to know — from spotting the signs of failure to choosing the right materials and getting the job done properly.
Conservatory flashing repair terms to learn:
Understanding Conservatory Flashing and Why It Fails
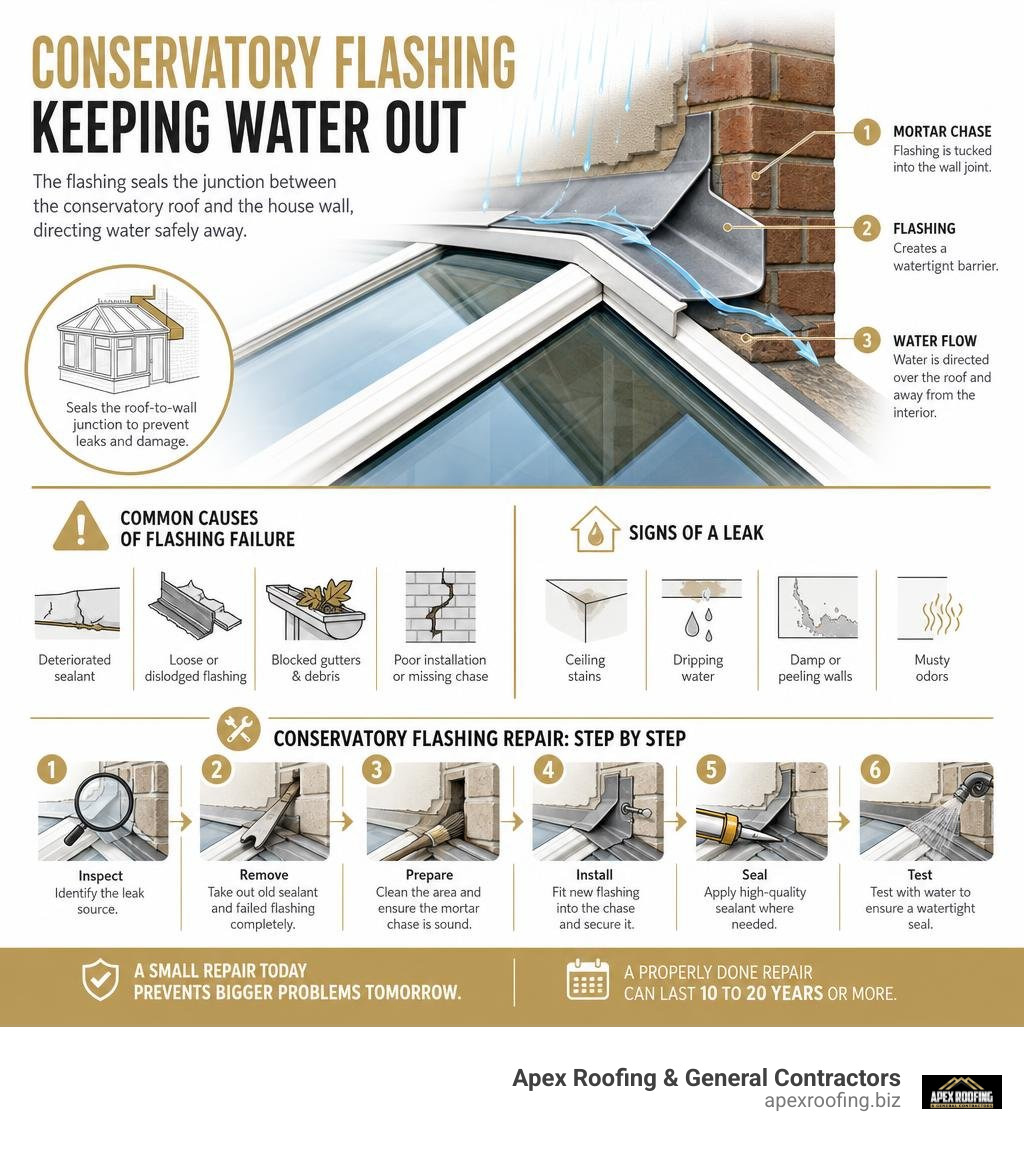
Conservatory flashing is the weatherproofing strip—traditionally made of lead sheet, flexible composite, or rigid synthetic material—that bridges the seam where the conservatory roof meets the exterior wall of your main home. Its primary job is to create an impermeable barrier that directs rainwater down off the house wall and onto the sloped roof glazing or tile system, directing water safely into the guttering.
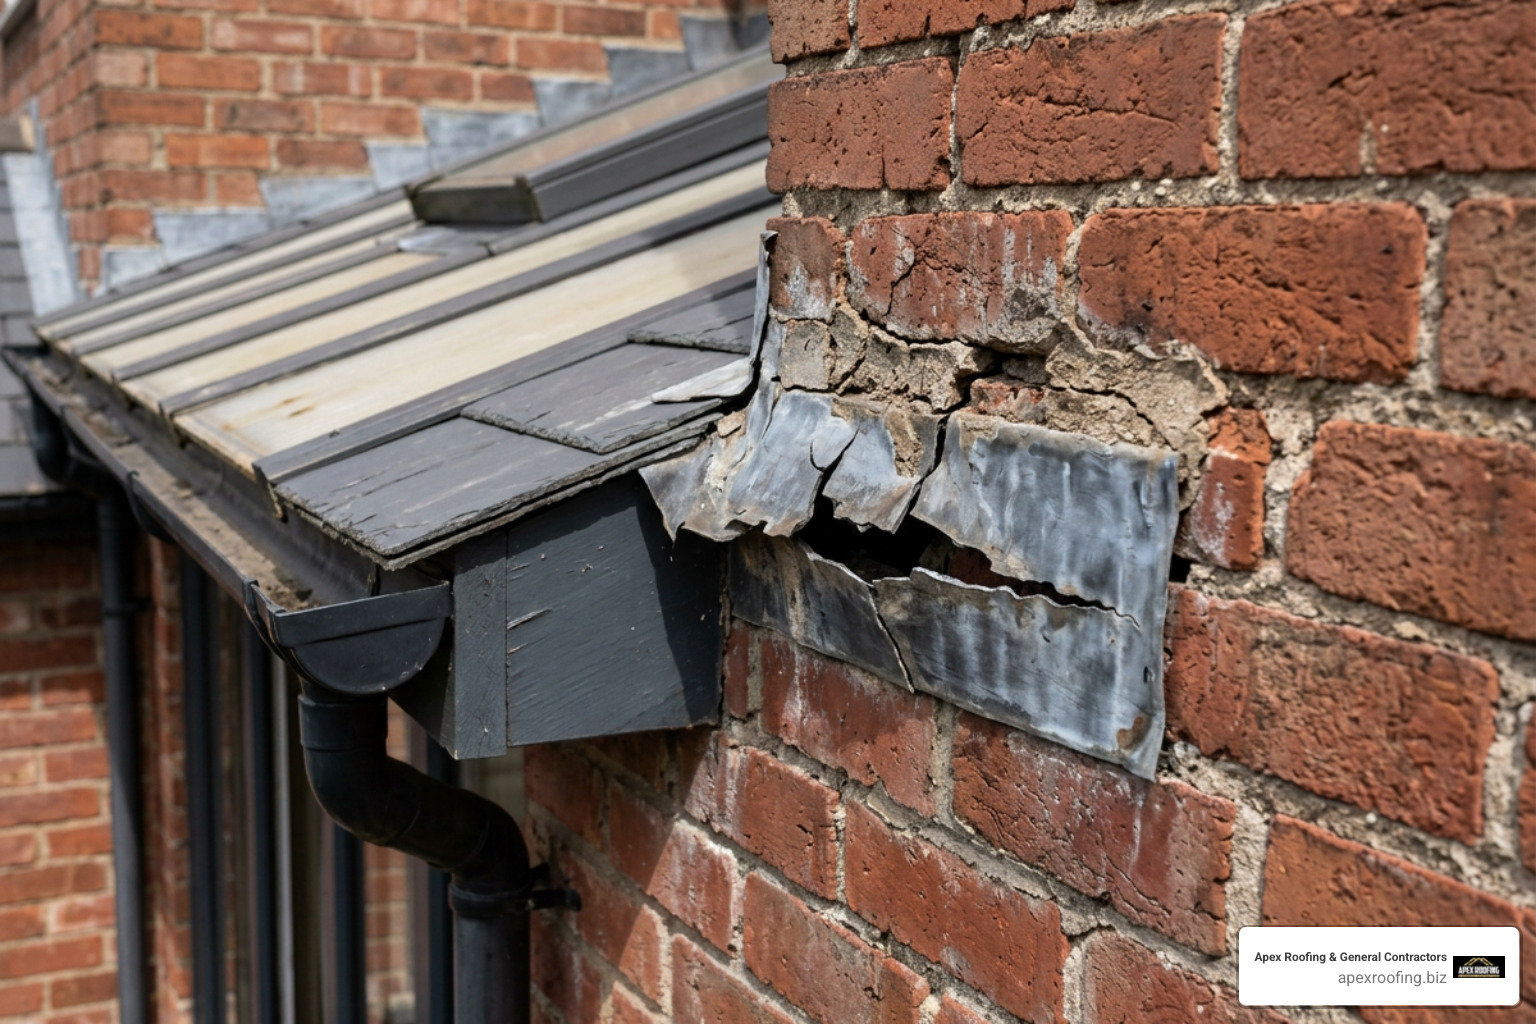
Because a conservatory is attached directly to an existing masonry structure, the wall junction represents a natural point of vulnerability. UK Building Regulations Part C mandates that all external wall-roof junctions receive sufficient water protection to prevent moisture penetration. Without effective flashing tucked neatly into the brick mortar joints, rainwater runs straight down the brickwork, sneaks behind the roof profile, and collects inside your living space.
To understand why this junction leaks, you need to understand Why Conservatory Flashing Fails. When flashing is improperly fitted or aged, it ceases to behave like a protective apron and begins acting as a trap for wind-driven rain and ice melt.
Signs Your Flashing Has Failed
Catching flashing issues early saves you thousands in drywall, timber framing, and ceiling repairs. Here are the clear indicators that your conservatory flashing is no longer doing its job:
- Damp patches near the main wall junction: Water marks or damp drywall appearing high up on the wall adjacent to the main house.
- Water dripping along sills or door frames: Water traveling along the conservatory wall plate and dripping down internal window sills or door headers.
- Peeling paint, bubbling plaster, or interior mold: Persistent moisture trapped behind plasterboard that breeds unsightly black mold and causes interior finishes to delaminate.
- Visible cracking, lifting, or splits in the flashing: Exterior inspection showing lead strips that have pulled out from mortar joints or split down the middle.
- Musty odors: A distinct damp smell hiding behind curtains or blinds, even when no standing water is immediately visible.
If you observe active indoor leaks during high-altitude or wind-driven rainfall, you should take action immediately. You can review our emergency triage strategies for Emergency Roof Leak Fix procedures to protect your interior furnishings before permanent repairs take place.
Primary Causes of Flashing Breakdown
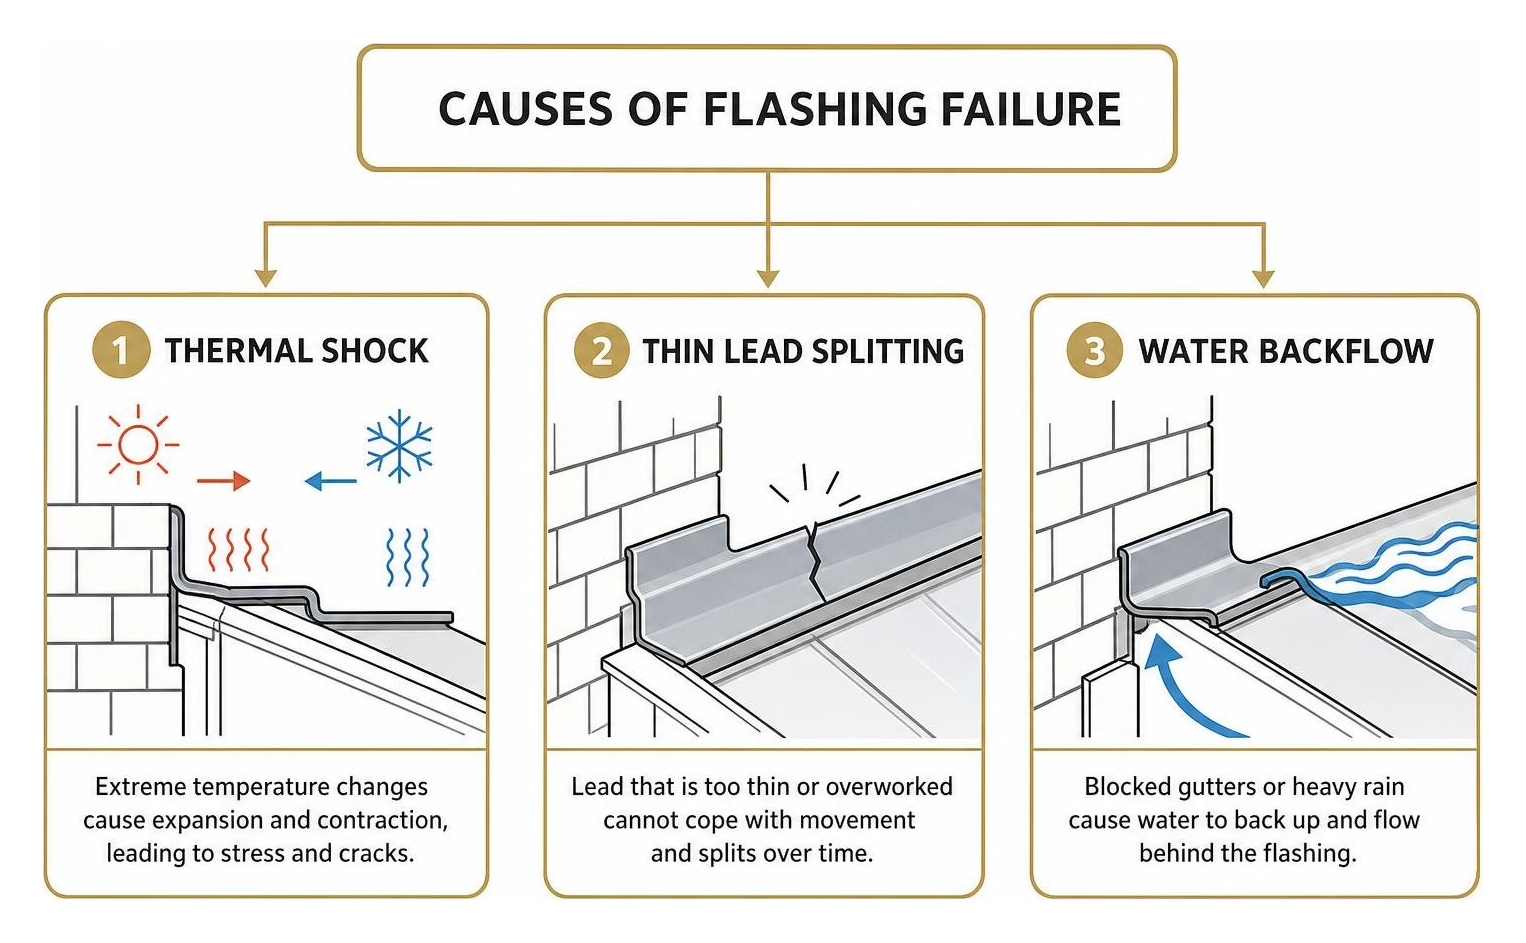
Flashing does not fail without reason. In our experience servicing residential roof structures, the root causes usually boil down to thermal physics, material selection, or poor installation craft:
- Differential Building Movement: Main brick houses and lighter conservatory frames expand and contract at completely different rates. Heat causes the conservatory structure to shift, put stress on static sealant lines, and pull rigid flashing out of wall chases.
- Thermal Expansion Stress: Lead undergoes significant thermal movement. If an installer fits lead flashing in long, uninterrupted continuous runs without allowance for expansion joints, daily heating and cooling cycles create mechanical stress splits.
- Inadequate Lead Gauge (Code 3 vs Code 4): Building standards recommend a minimum of Code 4 lead (1.8mm thick) for roof flashings. Many budget builders mistakenly install Code 3 lead (1.32mm thick). Code 3 lead is too thin for structural roof junctions and inevitably splits under climate cycles.
- Degraded Silicone and Adhesives: Installers frequently slap clear silicone or adhesive tapes across flashing gaps as a primary seal. Over time, UV light degrades silicone, causing it to shrink, peel, and hold moisture against the brickwork.
- Gutter Backflow and Moss Buildup: When gutters accumulate debris, water backs up until it crests the edge of the roof panels and subverts the lower lip of the flashing profile.
Complete Guide to Conservatory Flashing Repair and Materials
Selecting the right material is essential when carrying out a conservatory flashing repair. While lead remains the traditional benchmark across the UK roofing industry, innovative composite alternatives offer distinct advantages in speed, weight, and anti-theft performance.
For comprehensive details on professional solutions across the UK, explore specialized resources on Conservatory Flashing Repairs UK.
Comparing Flashing Materials: Lead, GRP, Ubiflex, and uPVC
Each material has key trade-offs in lifespan, flexibility, installation complexity, and cost:
| Material | Lifespan | Pros | Cons | Ideal Use Case |
|---|---|---|---|---|
| Code 4 Lead | 20–40+ Years | Traditional standard; extremely durable; highly malleable for dressing uneven brickwork; fully recyclable. | High scrap value makes it vulnerable to theft; heavier weight; requires skilled lead dressing/welding. | Heritage properties, brickwork abutments, and long-term permanent repairs. |
| Ubiflex | 30–40 Years | Composite structure; 40–60% cheaper than lead; non-toxic; zero scrap metal value (eliminates theft); BBA certified. | Requires specialized high-tack adhesive overlaps; visually distinct from traditional lead. | Modern residential retrofits, wooden conservatories, and high-theft risk areas. |
| GRP (Glass Reinforced Plastic) | 20+ Years | Completely seamless liquid or pre-formed membrane; smooth finish; rigid waterproofing barrier. | Specialized liquid application; rigid nature makes it prone to cracking on flexible wooden joints. | Solid conservatory roof conversions and continuous flat roof connections. |
| uPVC (Conservaflash) | 20+ Years | Precision-engineered uPVC system; includes capillary and twin weatherbar locator grooves; fast installation. | Requires roof profile compatibility; rigid components cannot be dressed over rough natural stone. | Engineered glass and tile conservatory installations (e.g., Ultraframe structures). |
Learn more about traditional lead flashing installation and material specs through Lead Flashing Replacements – Insulate My Conservatory.
Temporary DIY Solutions vs Permanent Conservatory Flashing Repair
When water leaks into your home, it is tempting to run to the nearest hardware store for a roll of adhesive flashing tape (such as Flashband) or a tube of clear silicone sealant. However, understanding the difference between temporary emergency triage and permanent repair is critical:
- Temporary Fixes (Flashing Tape & Silicone): Self-adhesive flashing tape or topical silicone caulking costs very little up front. However, adhesive flashing tape serves only as an emergency patch. Temperature fluctuations cause uPVC roof bars to move, breaking topical silicone bonds in a matter of months. Furthermore, topical silicone can trap water behind the flashing, accelerating hidden timber decay.
- Permanent Professional Repairs: A permanent repair involves cutting a mortar chase (joint) into the wall brickwork at least 15mm to 25mm deep. The flashing edge is mechanically inserted into the chase, anchored firmly using lead wedges, and point-sealed with non-corrosive, neutral-cure lead sealant (such as Leadmate or Flash-mate) or fresh mortar.
Homeowners attempting high-altitude DIY repairs should exercise extreme caution. Conservatory roof panels (whether glass or polycarbonate) cannot support direct human body weight. Working from ladders without proper staging boards or fall protection poses severe safety hazards.
Step-by-Step Professional Conservatory Flashing Repair Process
A proper conservatory flashing repair requires a systematic approach that combines mechanical masonry anchoring with controlled sealing techniques.
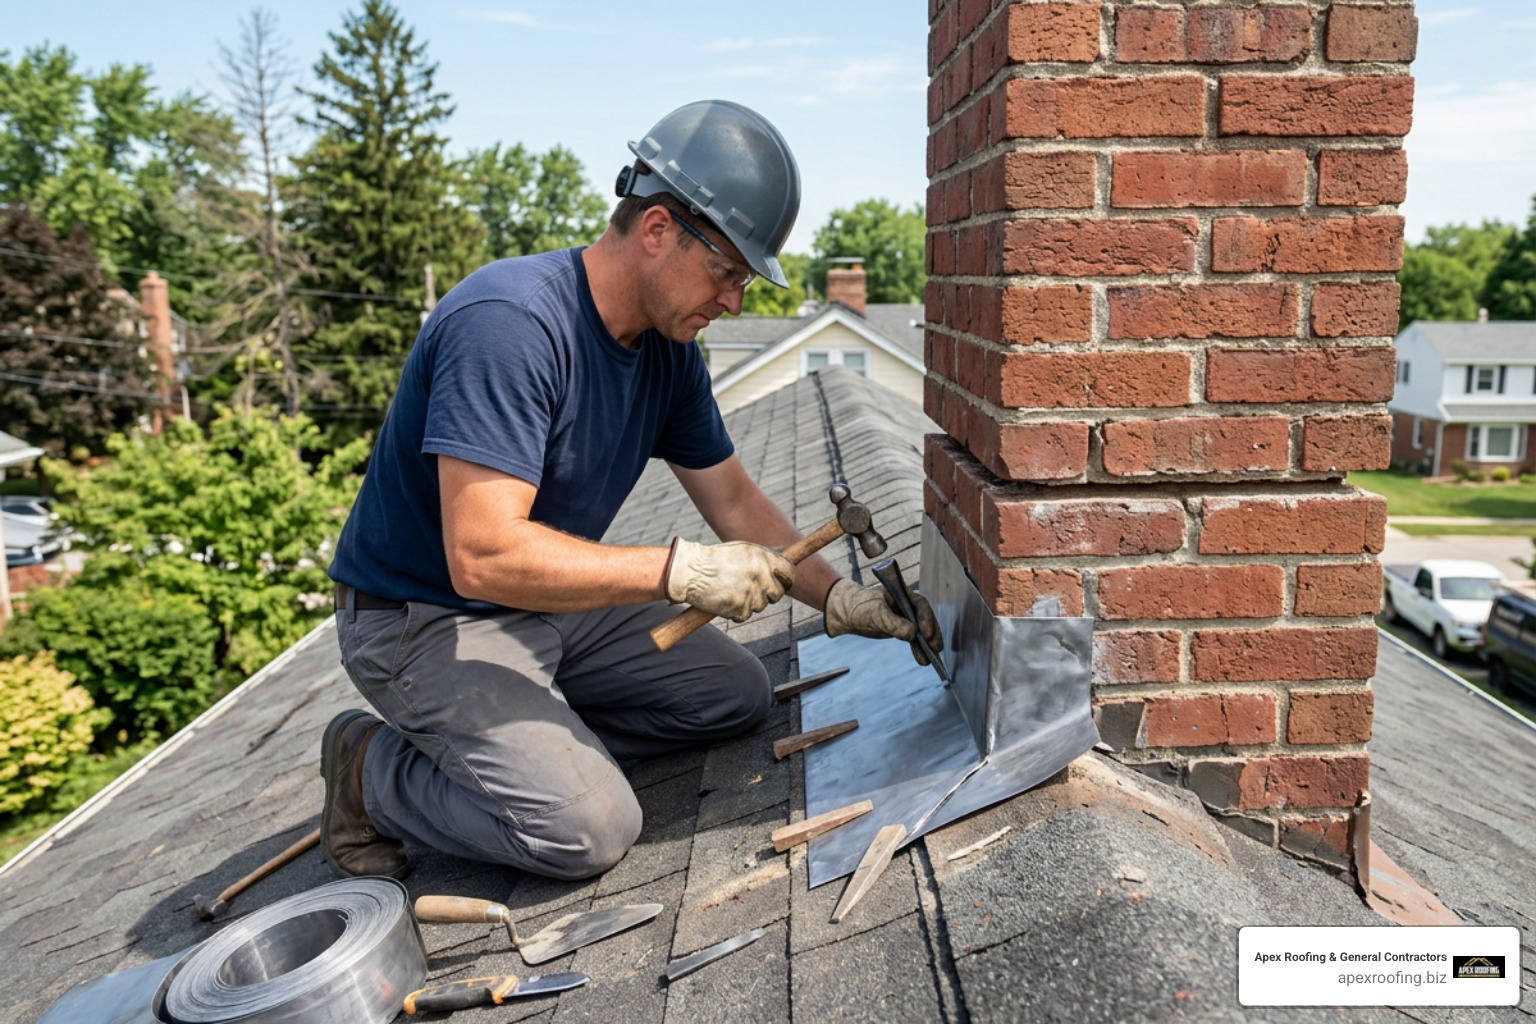
Detailed Step-by-Step Conservatory Flashing Repair Method
Here is how experienced tradespeople perform a complete, durable flashing repair:

- Step 1: Thorough Visual Inspection & Diagnostics: Tracing the internal water path using flashlights and moisture meters to verify that the leak originates at the wall flashing rather than a slipped glazing panel or perished bar gasket.
- Step 2: Removal of Compromised Materials: Scraping away all old, perished silicone, moss, and failed adhesive tapes. If existing lead is split or under-specified (Code 3), removing it entirely from the wall junction.
- Step 3: Mortar Chase Preparation: Raking or cutting a horizontal mortar joint into the brickwork abutment using a grinder or mortar rake to a depth of approximately 20–25mm. Cleaning away all dust and loose mortar debris.
- Step 4: Dressing and Securing New Flashing:
- Shaping Code 4 lead roll or Ubiflex flashing to match the pitch and profile of the conservatory roof.
- Inserting the top turned edge (lip) into the prepared mortar chase.
- Anchoring the flashing firmly into the brick joint using folded lead wedges spaced every 300–450mm.
- Step 5: Sealing the Joint: Pointing the mortar chase with dedicated lead-compatible neutral-cure sealant or high-grade mortar mix. Applying specialized locator sealant along the reverse face of weatherbar grooves.
- Step 6: Controlled Hose Testing: Spraying a controlled water stream from a garden hose starting at the bottom of the roof and working upwards along the flashing seam to confirm complete watertight performance before sign-off.
For step-by-step guidance on DIY roof maintenance kits and emergency tools, read Conservatory Roof Repair Kit: A Complete DIY Guide – New England Metal Roof.
Repairing vs Replacing Flashing vs Full Roof Repair
Homeowners often ask whether they need a localized flashing repair or an entirely new roof. Distinguishing between these options helps keep budget expectations realistic:
- Localized Flashing Resealing / Patching: Appropriate when lead is structurally sound (Code 4), but mortar joints have weathered loose, or a small spot weld is required on localized damage.
- Full Flashing Replacement: Necessary when old lead is cracked, thin (Code 3), severely corroded, or incorrectly installed without movement joints. Replacing the flashing leaves the main glass or polycarbonate roof panels intact while providing a fresh 20+ year seal at the house joint.
- Full Conservatory Roof Replacement: Recommended when water ingress has compromised internal structural rafters, or when thermal inefficiencies make upgrading to a solid tiled roof or modern glass system a better financial investment.
To evaluate comprehensive options for structural leak repairs, review The Ultimate Guide to Roof Leak Repair Services.
Costs, Longevity, and Prevention Strategies
Understanding repair pricing and preventive maintenance ensures you protect both your conservatory investment and your home budget.
For insights into budgeting for wider household roof repairs, check our detailed guide on The Cost to Fix a Leaking Roof.
Expected Lifespan of Flashing Repairs
When executed using building regulation-approved materials, a conservatory flashing repair provides reliable long-term protection:
- Code 4 Lead Flashing: Expect a lifespan of 20 to 40+ years when properly dressed and installed in bays under 1.5 meters to accommodate thermal expansion.
- Ubiflex Composite Systems: Offers 30 to 40 years of weatherproofing backed by BBA certification.
- Engineered uPVC (Conservaflash): Provides 20+ years of maintenance-free performance. In fact, pre-configured systems like Conservaflash can save up to £75 compared to traditional lead on a typical 4m x 4m Georgian conservatory roof installation while saving over an hour in labor. Learn more about engineered systems via Conservaflash | Ultraframe Flashing Fabricators Rotherham UK.
- Minor Sealant Repairs: Last between 3 to 7 years before requiring routine inspection and touch-ups.
Practical Tips to Prevent Future Flashing Failures
Preventive care stops small gaps from developing into interior water damage. Follow these routine maintenance practices:
- Clear Gutters Biannually: Remove leaves, twigs, and moss from conservatory gutters every spring and autumn to prevent water backflow behind flashing aprons.
- Inspect Flashing Every 12–24 Months: Conduct ground-level visual inspections using binoculars or an interior flashlight after severe windstorms or heavy hail.
- Avoid Harsh Chemicals: Clean roof panels using non-abrasive, neutral detergents that will not degrade lead sealants or uPVC coatings.
- Repoint Deteriorating Mortar Early: Address crumbling brick mortar joints above the flashing line before rainwater can trickle behind the masonry chase.
Additional techniques on diagnosing structural leaks can be found at Fixing Leaking Conservatory Roof Flashing – New England Metal Roof.
Frequently Asked Questions About Conservatory Flashing
How much does conservatory flashing repair typically cost?
In the UK, minor flashing repairs (such as resealing mortar joints or fixing localized gaps) generally cost between £200 and £400. A full flashing replacement across the entire house-to-conservatory junction typically ranges from £400 to £1,200+, depending on roof length, access requirements, scaffolding needs, and material choices (e.g., Code 4 lead vs Ubiflex).
How long does a proper flashing repair last?
A professionally installed flashing replacement using Code 4 lead or BBA-approved composite material like Ubiflex will last 20 to 40 years. Minor spot repairs or resealing with high-grade neutral-cure lead sealants typically provide 10 to 20 years of weatherproofing performance when properly maintained.
Is silicone sealant enough to fix a leaking flashing joint?
No. Standard silicone sealant applied topically over a leaking joint is strictly a short-term temporary measure. Because conservatories and house walls expand and contract at different rates due to thermal movement, topical silicone quickly cracks and peels away. Furthermore, improperly applied silicone can trap water behind the flashing, accelerating moisture damage and wood rot inside the frame. Permanent repairs require cutting a mechanical chase into the mortar joint and securing proper flashing materials.
Conclusion
A leaking conservatory roof-to-wall junction should never be ignored. What starts as a small trickle during heavy rainfall can quickly turn into hidden drywall rot, black mold growth, and costly timber framing damage. By addressing flashing failures promptly with durable Code 4 lead or modern composite materials like Ubiflex, you protect both your property’s value and your peace of mind.
At Apex Roofing & General Contractors, our team delivers certified, reliable service backed by transparent communication and strict compliance with local building codes. Whether you need an expert leak diagnosis, specialized flashing installation, or comprehensive residential roofing solutions in San Antonio and surrounding areas—including Helotes, Shavano Park, and Alamo Heights—we are here to help.
If you are experiencing water intrusion or require immediate assistance with your home’s roof joints, explore our local San Antonio roof repair services or schedule a professional inspection through our main residential roof repair services page today.
Have questions or need free estimates? Contact our team directly at Apex Roofing & General Contractors or call us at (726) 727-7663 for a free inspection to keep your home warm, dry, and protected for years to come.