Evaluating Your Roof: When is a Patch Enough?
Patching asphalt shingles is one of the most practical and cost-effective ways to protect your home from water damage — without the expense of a full roof replacement. If you’ve spotted a cracked, curled, or missing shingle, you’re in the right place. Our professional roof repair services cover everything from minor patches to complex storm damage, but many localized repairs can also be handled with the right knowledge and tools.
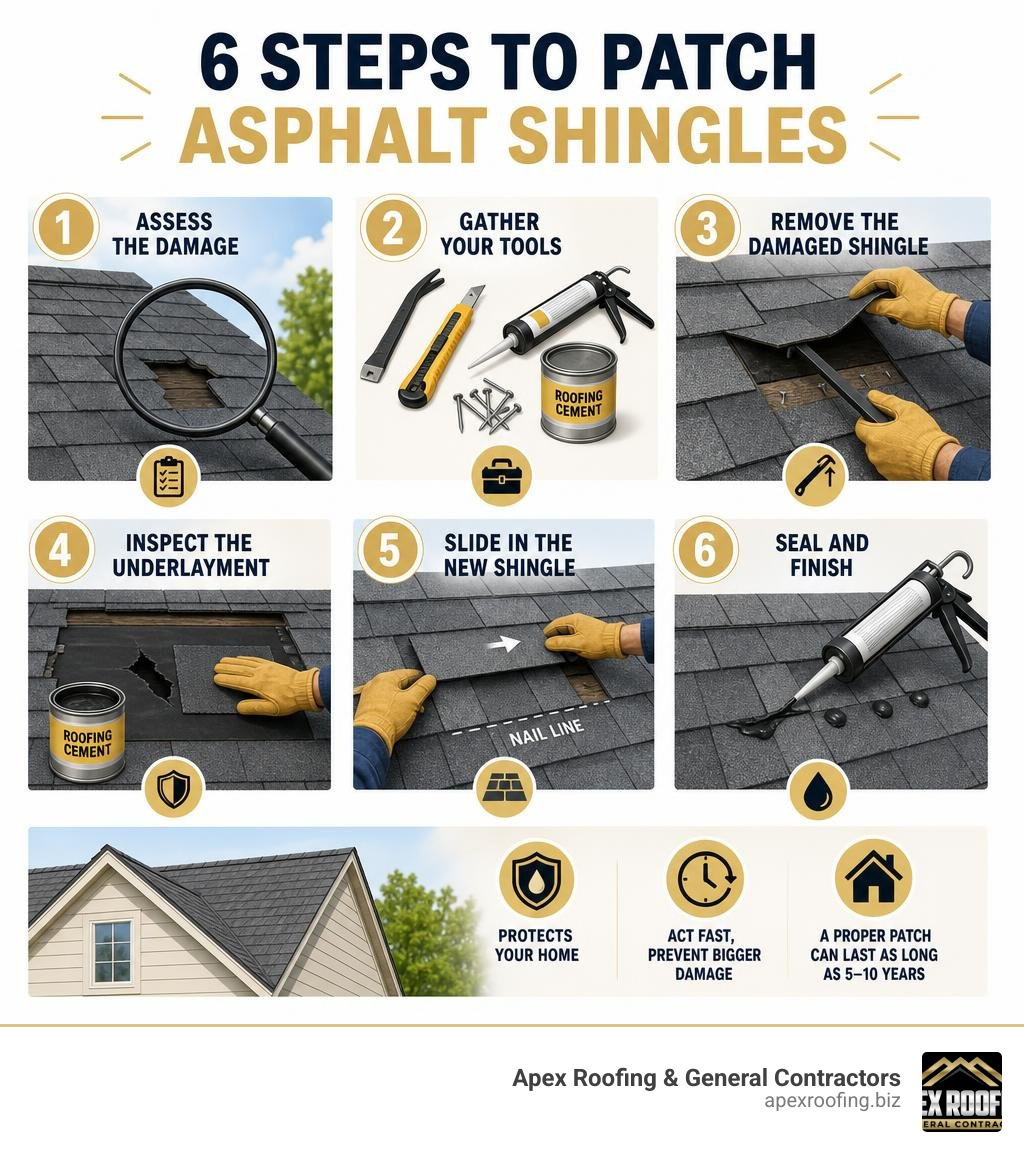
Here’s how to patch asphalt shingles — fast answer:
- Assess the damage — confirm it’s isolated and the roof deck is solid
- Gather tools — flat pry bar, utility knife, galvanized nails, roofing cement, caulk gun
- Remove the damaged shingle — lift surrounding shingles, extract nails, slide out the old shingle
- Inspect the underlayment — patch any tears with roofing felt and cement
- Slide in the new shingle — align with surrounding courses, nail at the manufacturer’s nail line
- Seal and finish — apply roofing cement under tabs and over nail heads, press firmly
A damaged roof doesn’t always mean a costly replacement. Around 75% of U.S. homes use asphalt shingles, and roughly 20% of all roofing maintenance is simply patching work. A properly executed patch — nailed and sealed correctly — can last as long as the surrounding shingles, often 5 to 10 years or more.
The key is acting fast. A single failed shingle tab is all it takes for water to sneak under your roof deck, rot the wood, and turn a $150–$300 repair into a $3,000 rebuild. If you’re a San Antonio homeowner dealing with storm damage or age-related wear, catching the problem early makes all the difference.
I’m Carlos Yzaguirre, President and Managing Partner of Apex Roofing & General Contractors — since co-founding the company in 2022, I’ve overseen hundreds of residential roofing projects across Texas, including countless patching asphalt shingles repairs ranging from single cracked tabs to multi-section storm damage. In this guide, I’ll walk you through exactly what our team does on every patch job, so you can make an informed decision — whether you’re tackling it yourself or calling in a pro.
Patching asphalt shingles terms simplified:
Before you climb a ladder with a bucket of cement, you must determine if your roof is a candidate for a patch or if it requires a complete tear-off and replacement.
Patching asphalt shingles is highly effective when the damage is isolated to a small, defined area. Common scenarios where a patch is appropriate include:
- A single shingle cracked or punctured by a fallen tree branch.
- One or two shingles that blew off during a severe South Texas windstorm.
- A small puncture hole caused by a dropped tool, stray nail, or hail impact.
- Curled shingle corners on an otherwise healthy, mid-lifespan roof.
However, a patch is merely a temporary band-aid if your roof is exhibiting systemic failure. Asphalt shingles typically last between 15 and 30 years. If your roof is nearing the end of this window, the shingles will lose their pliability. Under the intense Texas sun, older shingles suffer from extreme thermal shock—the rapid expansion and contraction caused by 100°F afternoons followed by sudden evening thunderstorms. This thermal stress makes older shingles brittle, meaning attempting to lift them to patch a leak will simply cause surrounding shingles to crack and fail.
To help you evaluate your roof’s condition, use our comprehensive Shingle Repair Ultimate Guide to inspect both the exterior and interior of your home. If you notice structural sagging, widespread granule loss in your gutters, or water stains spreading across your attic ceiling, these are indicators that your roof deck is compromised. In these instances, a patch will trap moisture and accelerate wood rot. You should instead contact a certified local contractor for a professional inspection.
Essential Tools and Materials for Patching Asphalt Shingles
Executing a durable patch requires specialized tools and high-quality materials. Using incorrect substitutes, like standard household caulk or duct tape, will trap moisture and fail within a single season.
Required Safety Gear and Tools:
- Fall Protection: A fully secured safety harness and a sturdy ladder. Ensure your ladder extends at least three feet above the roofline and follows the 4-to-1 safety rule (for every four feet of height, the base should be one foot away from the wall).
- Flat Pry Bar (Flat Bar): Essential for breaking the factory sealant strip and prying up roofing nails without tearing the surrounding shingles.
- Utility Knife: Used for trimming replacement shingles or cutting patching membranes.
- Hammer & Galvanized Roofing Nails: Always use 1¼-inch minimum, heavy-duty galvanized roofing nails to prevent rust and corrosion.
- Caulk Gun & Putty Knife: For applying and smoothing sealants.
Choosing the Right Adhesive: Cement vs. Tar vs. Sealant
A common point of confusion for DIYers is the difference between roofing cement, roofing tar, and liquid sealants. Each serves a distinct purpose in asphalt roof maintenance:
| Material | Best Used For | Pros | Cons | Typical Lifespan |
|---|---|---|---|---|
| Roofing Cement | Securing new shingles, sealing nail heads, and repairing minor tears. | Excellent instant adhesion, completely waterproof, highly durable. | Thick and messy to apply; can crack over time if applied too heavily. | 3 to 7 Years |
| Roofing Tar (Cold-Applied) | Emergency leak sealing, flat-roof transitions, and wide flashing joints. | Extremely flexible, works well on low-slope areas, highly cost-effective. | Not suitable as a primary adhesive for pitched shingles; can run in extreme heat. | Weeks to Months (Temporary) |
| Liquid Roof Sealant (Polyurethane/Silicone) | Sealing around penetrations, vents, and minor hairline cracks. | High elasticity, excellent UV resistance, easy to apply with a caulk gun. | More expensive; requires a completely dust-free surface to adhere properly. | 3 to 8 Years |
When selecting materials, consult the Asphalt Roofing Manufacturers Association (ARMA) Technical Guidelines to ensure compatibility. For most shingle repairs, a high-quality asphalt-based roofing cement (such as Henry’s 208) is the industry standard for creating a permanent, watertight bond. If you are sealing small cracks, you can also explore specialized shingle roof tar applications for rapid, temporary relief during storm seasons.
The Step-by-Step Shingle Replacement Process
Replacing a damaged shingle is a precise process of reverse-engineering. Because asphalt shingles overlap in courses, a single shingle is actually secured by nails driven through the shingle directly above it.
Step-by-Step Instructions for Patching Asphalt Shingles
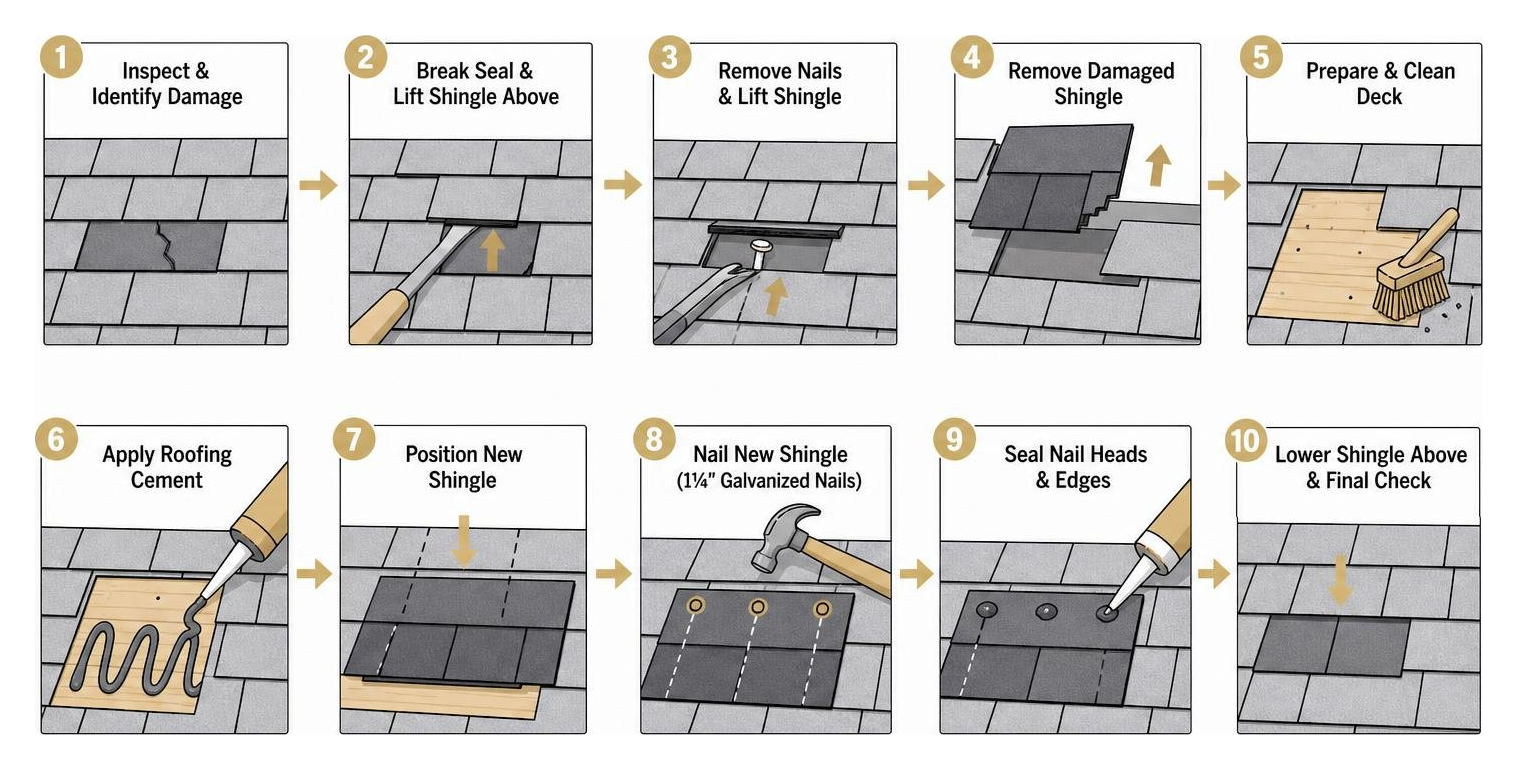
Follow these steps carefully to replace a damaged shingle without harming the surrounding roof structure:
- Work in Mild Temperatures: Choose a dry, overcast day when temperatures are between 50°F and 80°F. If it is too cold (below 40°F), asphalt shingles become brittle and crack when handled. If it is too hot (above 85°F), the shingles soften, making them highly susceptible to losing their protective granules under your boots.
- Break the Sealant Strip: Slide your flat pry bar gently beneath the tab of the damaged shingle to break the factory adhesive seal. Do the same for the shingles in the row directly above the damaged one, as they overlap the nails you need to reach.
- Locate and Extract the Nails: Slide the pry bar up under the damaged shingle until you feel a nail. Position the bar’s claw under the nail head and pry upward. To prevent tearing the shingle, place a small block of wood under the pry bar to act as a fulcrum. Remove all 4 to 6 nails holding the damaged shingle, as well as the nails in the row directly above that pass through the top of the damaged piece.
- Slide Out the Damaged Shingle: Once all nails are extracted, gently slide the damaged shingle down and out of the course. If it resists, check for a missed nail.
- Inspect and Prep the Substrate: Clean away any loose dirt, old cement, or stray granules from the exposed underlayment. Inspect the wood decking beneath. If you find soft, dark, or rotting wood, stop immediately—patching over a rotten deck is a critical error. If the underlayment has a minor tear, patch it with a piece of 30# roofing felt and a thin layer of roofing cement before proceeding. For a deeper dive into this step, see our guide on replacing damaged shingles without losing your mind.
- Install the Replacement Shingle: Slide the new shingle up into the gap, aligning its bottom edge perfectly with the shingles on either side.
- Nail It Down: Drive four new 1¼-inch galvanized roofing nails into the designated nail line (just below the sealant strip). Be sure to nail straight and flush—crooked or over-driven nails will cut into the shingle and cause premature wind blow-offs. Drive nails through the overlapping shingle above as well.
- Seal the Tabs: Lift the tabs of the new shingle and apply three quarter-sized dabs of roofing cement underneath using your caulk gun. Press the shingle down firmly to secure the bond. Apply a small dab of cement over any exposed nail heads to seal them against wind-driven rain.
For a highly detailed walkthrough of the physical mechanics involved in this process, read our comprehensive tutorial on single shingle replacement.
Patching Around Roof Penetrations and Flashing
Roof penetrations—such as vent pipes, chimneys, and skylights—are the most common sources of residential roof leaks. These areas rely on metal flashing to shed water, which can rust, warp, or pull away from the roof deck over time.
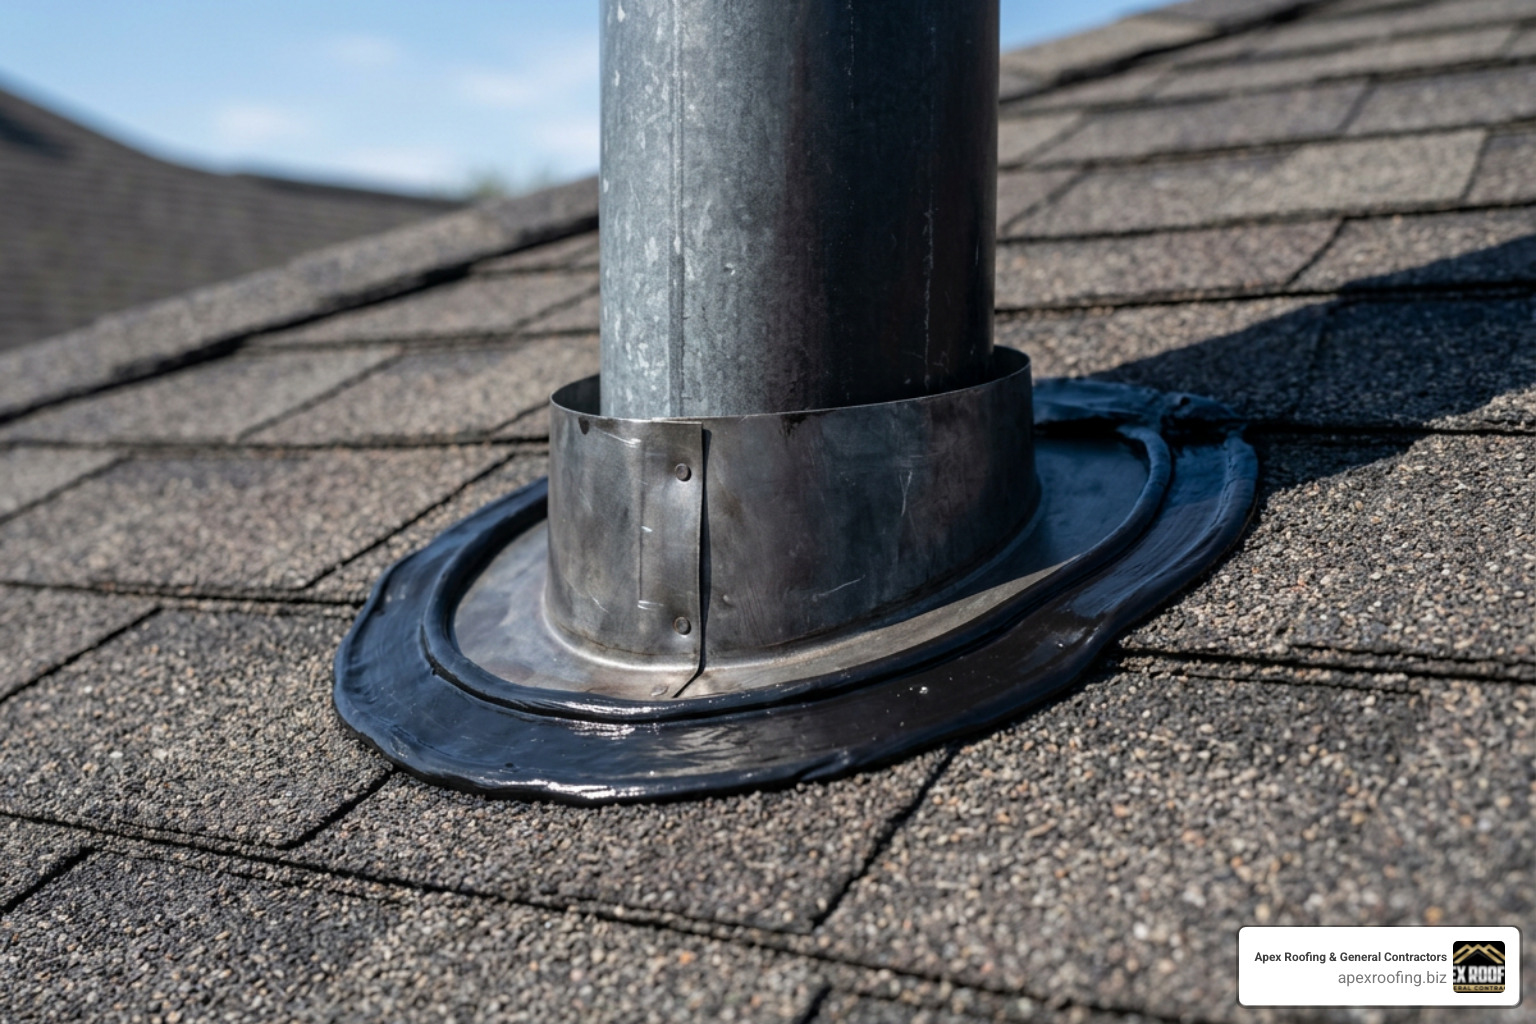
When patching around these penetrations, follow these specialized guidelines:
- Vent Pipes: Inspect the rubber boot around the base of the pipe. If the rubber is cracked or dry-rotted, you must replace the collar. Apply a thick bead of polyurethane roof sealant around the seam where the metal base meets the shingles, smoothing it with a putty knife to direct water away from the joint.
- Chimneys: Chimneys utilize a two-part flashing system: step flashing beneath the shingles and counter-flashing embedded in the brick mortar. If step flashing has rusted through, slide a new piece of pre-bent metal flashing under the shingle, secure it with a single nail, and seal the edges with roofing cement.
- Skylights: Skylight leaks are often caused by water backing up behind the top frame. When patching around a skylight, ensure your shingles and flashing extend well beyond the frame’s edges to maintain a positive water flow. Never block the low side of skylight flashing, as trapped water will quickly find a seam and enter your home.
Innovative patching solutions, such as those detailed in the US-2018283026-A1 shingle repair patch patent, highlight the industry’s shift toward multi-piece peel-and-stick adhesive systems for sealing complex flashing transitions. However, if your flashing is severely corroded or damaged, a professional repair is highly recommended to prevent hidden, long-term structural rot.
Ensuring a Long-Lasting Roof Repair
A patch is only as good as the maintenance that follows it. To maximize the lifespan of your repair, you must protect it from the elements and avoid common installation mistakes.
Common DIY Pitfalls When Patching Asphalt Shingles
Many well-intentioned DIY roof repairs fail prematurely due to a few common mistakes:
- Patching Over Rotten Decking: Nailing a fresh shingle into soft, water-damaged plywood is useless. The nails will quickly pull free, and the underlying rot will continue to spread throughout your attic.
- Improper Nail Placement: Driving nails too high misses the double-layer nailing zone, making the shingle highly susceptible to being ripped off by strong winds.
- Using Mismatched Shingles: Always match the exact style (3-tab vs. architectural) and weight of your existing shingles. Installing a lighter 3-tab shingle next to thick architectural shingles creates an uneven surface that allows wind to catch the edges and lift the entire row.
- Over-Applying Roofing Cement: While roofing cement is highly effective, applying too much of it can act as a dam, trapping water behind the shingle and forcing it under the courses above. Apply cement sparingly and strategically.
If you suspect your roof has multiple leaks, review our 5 tips and tricks for shingle leak repair to identify hidden water entry points before they cause major drywall damage. Additionally, if you have a physical puncture, our guide on how to repair a hole in a shingle roof provides specialized steps for sealing deep structural penetrations.
Post-Repair Maintenance and Lifespan Expectations
A properly executed shingle patch should last between 5 and 10 years, effectively matching the remaining lifespan of the surrounding roof. However, the extreme UV rays and intense summer heat in South Texas will accelerate the degradation of any exposed sealants.
To ensure your patch stands the test of time, implement these preventative maintenance practices:
- Bi-Annual Inspections: Inspect your roof at least twice a year, ideally in the spring and fall, to check for lifted edges, cracked sealants, or new storm damage.
- Keep Gutters Clear: Clogged gutters cause water to back up under the lower courses of shingles, which will quickly destroy even the most secure patch. Clean your gutters at least twice a year.
- Monitor Granule Loss: Keep an eye on the patched area for premature baldness. If the protective mineral granules wear away, the underlying asphalt will quickly degrade under the sun’s UV rays.
For comprehensive maintenance standards, refer to the National Roofing Contractors Association (NRCA) Maintenance Guidelines to keep your entire roofing system in peak condition.
Frequently Asked Questions About Shingle Repairs
Can you patch a section of roof shingles in the winter?
Yes, you can patch shingles in the winter, but cold weather introduces significant challenges. Below 40°F, asphalt shingles become highly brittle and can crack like glass when handled. Additionally, the self-sealing adhesive strips on shingles require solar heat to activate and bond.
If you must perform an emergency repair in cold weather, store your replacement shingles in a warm room until the moment of installation. After nailing the shingle down, you must manually apply dabs of cold-weather-rated roofing cement under each tab to secure it, as the factory sealant strip will not bond until spring. For detailed cold-weather protocols, refer to the Asphalt Roofing Manufacturers Association Cold Weather Installation Standards.
What is the average cost of minor roof shingle repairs?
For minor, localized issues—such as repairing a few blown-off shingles, sealing a small puncture, or patching minor flashing damage—professional repair costs typically range from $150 to $1,500, depending on the slope, accessibility, and extent of the damage.
If you choose to tackle the repair yourself, the material costs are incredibly low:
- A bundle of replacement shingles: $35–$50
- A tube of high-quality roofing cement: $8–$15
- A box of galvanized roofing nails: $10–$15
- Basic hand tools (pry bar, utility knife): $20–$30
While DIY patching is highly cost-effective, it lacks warranty protection. If a DIY patch fails and leads to interior water damage, you are responsible for the entire cost of remediation. For a complete breakdown of professional repair pricing, check out our guide on the cost to fix roof shingles.
How do you cosmetically hide a repair on a cracked shingle?
A brand-new replacement shingle will often stand out like a sore thumb against an older, weathered roof. If you are patching a minor crack or tear in an otherwise healthy shingle without replacing the entire sheet, you can use the “gutter granule” camouflage trick:
- Apply a thin, neat bead of clear or black roofing sealant directly over the crack using a caulk gun.
- Smooth the sealant flat with a putty knife.
- Go to your gutters and scoop up a handful of the loose, colored mineral granules that have washed off your shingles over time.
- Generously sprinkle these loose granules over the wet sealant, pressing them in gently with your gloved hand.
Once dry, the granules will completely mask the shiny sealant, blending the repair seamlessly into the surrounding roof and protecting the patch from UV degradation.
Conclusion

Patching asphalt shingles is a highly effective, budget-friendly way to extend the lifespan of your roof and protect your home from costly water damage. Whether you choose to tackle a minor patch yourself or partner with a professional, addressing shingle damage early is the key to maintaining your home’s structural integrity.
If your roof has suffered severe storm damage, is showing signs of widespread wear, or if you simply prefer the peace of mind that comes with certified, code-compliant workmanship, we are here to help. At Apex Roofing & General Contractors, we provide expert roofing services across the San Antonio area, including Shavano Park, Helotes, and Alamo Heights. Our team ensures every repair complies with local building codes and is engineered to withstand the unique climate challenges of South Texas.
Don’t wait for the next heavy rainstorm to test your roof’s limits. Explore our Shavano Park roofing services or our Helotes roofing services to secure your home. We offer free estimates to help you plan your repairs with confidence. If you’re ready to schedule a free inspection, Call Apex Roofing at (726) 727-7663 today to speak with our local team!