Professional Asphalt Shingles Roof Installation in San Antonio
A professional asphalt shingles roof installation requires comprehensive structural planning, adherence to local building codes, and skilled craftsmanship to protect residential properties from severe weather. Rather than attempting a hazardous DIY replacement, property owners benefit from understanding the core structural standards, waterproofing layers, and engineering protocols certified contractors follow. From evaluating the roof deck and underlayment to securing specialized perimeter flashing and ridge ventilation, a complete roofing system works together to shed water and withstand extreme wind loads. From mitigating storm impacts to maximizing energy efficiency, proper shingle application demands technical precision. For homeowners seeking long-term performance and code compliance, relying on expert roofing contractor services from Apex Roofing & General Contractors ensures every layer meets stringent manufacturer specifications and local municipality requirements.
Asphalt shingles require a minimum roof slope pitch of 2:12, with specific underlayment and double-layer waterproofing rules applied to lower slopes. Environmental factors such as high winds, extreme heat, and severe hail dictate specific fastening, flashing, and sealing protocols.
I’m Carlos Yzaguirre, President and Managing Partner of Apex Roofing & General Contractors, which I co-founded in 2022. I lead roofing teams serving Texas properties with professional asphalt shingles roof installation, storm repairs, and full roof replacements built around clear communication and quality workmanship.

Essential Safety and Roof Deck Preparation
Professional roof replacement begins with risk control, structural evaluation, and confirmation that the existing roof assembly can support a new code-compliant system. Working at elevated heights presents substantial fall hazards, so professional crews follow OSHA fall protection rules (29 CFR 1926.501) for any work performed 6 feet or more above lower levels. Proper safety equipment includes personal fall arrest systems (PFAS) featuring full-body safety harnesses, shock-absorbing lanyards, and secure roof anchors rated for 5,000 pounds of tensile strength.
Extension ladders must be placed at a strict 4-to-1 ratio (1 foot out from the vertical structure for every 4 feet of height to the eave) and must extend at least 3 feet above the roof edge to support safe jobsite access by trained crews.
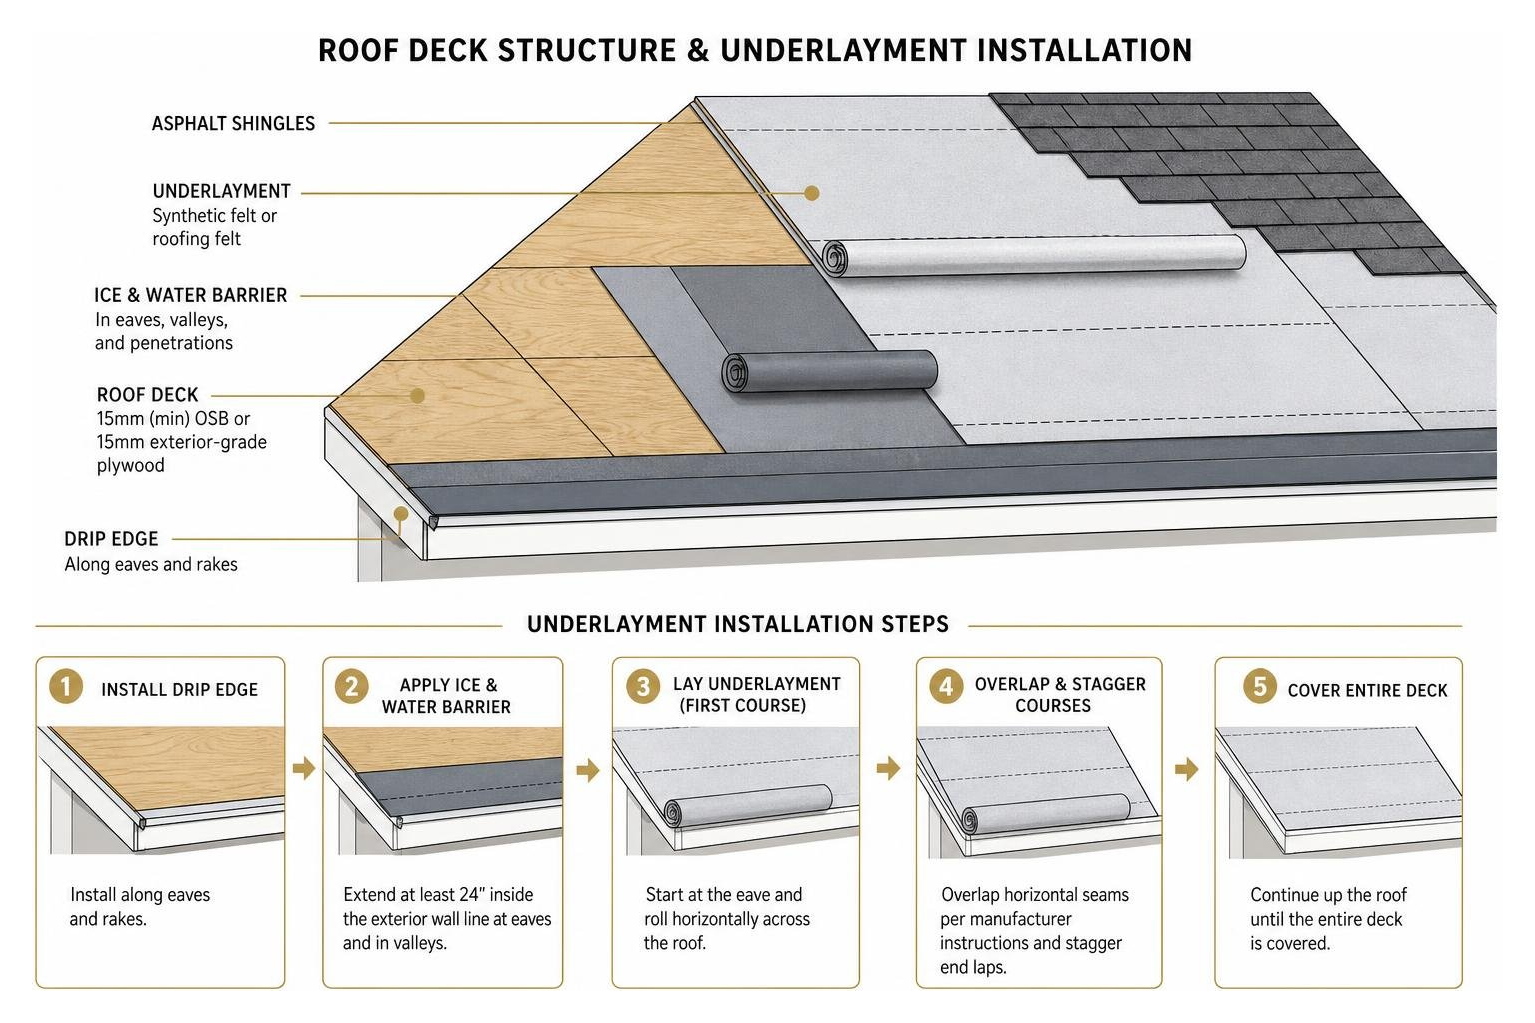
Evaluating substrate integrity requires examining the wooden sheathing before any new roof covering is approved. Code-compliant roof decking typically consists of a minimum of 15mm (or 7/16-inch) oriented strand board (OSB) or 15mm exterior-grade plywood. In central Texas, local building codes and municipal permit requirements require roof decks to be inspected, clean, dry, smooth, and structurally sound before secondary water barriers are accepted as part of a roof replacement. When navigating Texas insurance claims following hail or wind storms, documented deck inspections and permit verification are critical for supporting complete policy review and scope accuracy. For additional insights on local residential requirements, review our detailed Residential Shingle Roofing San Antonio Guide.
Roof Deck Inspection and Safety Protocols
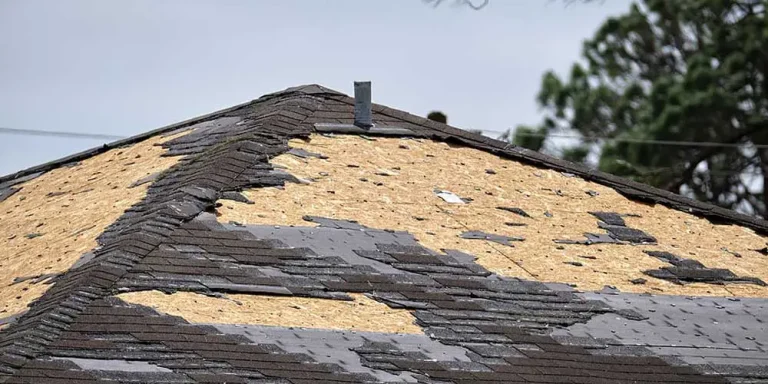
Before a roof system is approved for replacement, certified crews evaluate whether the roof deck shows signs of deterioration, movement, or moisture damage. In South Texas, spring hail impacts, high winds, San Antonio heat and UV load, and intense thermal cycles can accelerate wear on roof coverings and expose weaknesses in older decking.
Professional safety setup and deck preparation are focused on verifying conditions such as:
- OSHA-compliant fall protection planning, anchor placement, and controlled roof access.
- Whether old roofing has concealed rotted, cracked, delaminated, or sagging plywood.
- Whether protruding fasteners, nail fragments, or staples could puncture new moisture-control layers.
- Whether sawdust, loose granules, organic debris, or damp areas could interfere with manufacturer-approved materials.
Expansive clay soils are another important regional concern for Texas structures. Foundation movement can transfer stress into wall lines, roof framing, and decking planes, creating gaps, uneven sheathing, or visible waves that should be evaluated before a roofing system is certified for replacement.
Underlayment, Drip Edge, and Ice Barrier Specifications
An asphalt roof system relies on overlapping secondary moisture barriers to manage wind-driven rain and limit water intrusion if shingles are damaged during a storm. Rather than serving as optional accessories, underlayment, drip edge metal, and self-adhering leak barriers are part of the complete waterproofing assembly reviewed during professional installation and inspection.
At eaves, drip edge flashing is expected to protect vulnerable fascia and deck edges from water backing up beneath the roof covering. At rakes, drip edge integration is evaluated for wind-blown rain control along gable edges. Inspectors and manufacturers also review whether the selected underlayment type, lap configuration, and fastening method match the roof slope, material warranty, and local permit requirements.
On standard roof slopes of 4:12 and greater, synthetic underlayment or #30 asphalt-saturated felt is commonly specified as the secondary barrier beneath asphalt shingles. On low-slope roofs between 2:12 and 4:12, double underlayment or an approved self-adhering membrane system is required because slower water runoff increases leak risk. Slopes below 2:12 are not appropriate for asphalt shingles and typically require a low-slope membrane roofing system.
Self-adhering polymer-modified bitumen membranes provide added protection in valleys, eaves, and vulnerable perimeter areas where water loads are highest. The ice and water barrier must extend from the lowest roof edge to a point not less than 24 inches inside the interior plane of the home’s exterior wall. For technical considerations during colder months, explore our guide on Installing Asphalt Shingles In Winter.
Technical Standards for Asphalt Shingles Roof Systems
A successful asphalt shingles roof installation depends on accurate specifications, manufacturer-approved materials, and quality-control documentation by trained professionals. Homeowners should avoid relying on simplified material calculators or online tutorials because roof geometry, waste factors, valley design, ventilation, deck condition, and local code requirements all affect the final scope of work.
Professional contractors evaluate roof area, slope, penetrations, perimeter details, and storm exposure before ordering materials or recommending a roof assembly. That evaluation helps prevent under-scoped Texas insurance claims, warranty exclusions, and premature roof failures. To gain a broader understanding of standard roofing terminology and field considerations, refer to the Asphalt Shingle Installation: Step-by-Step Process 2026 documentation.
Starter Strip Functions and Edge Alignment
Starter strips create the first sealed perimeter line along eaves and rakes, where wind uplift is most likely to begin. Missing or poorly integrated starter strips are a common cause of storm-related shingle loss, especially during high-wind events in the San Antonio region.
During a professional inspection, starter strip quality is evaluated for:
- Proper compatibility with the selected shingle system and manufacturer warranty.
- Correct edge coverage so rainwater is directed into gutters instead of back toward fascia.
- Sealant placement that supports wind-uplift resistance at the roof perimeter.
- Offset end joints that reduce the likelihood of water entering through aligned gaps.
In high-wind environments, contractors may specify enhanced perimeter sealing methods when required by the shingle manufacturer, local code, or storm-resilience design criteria.
Field Shingle Fastening and Engineering Standards
Field shingles must be secured according to the manufacturer’s tested fastening pattern and the wind rating required for the property. This is not a cosmetic detail; fastener type, position, and depth determine whether the shingle assembly can resist uplift, thermal movement, and impact-related stress.
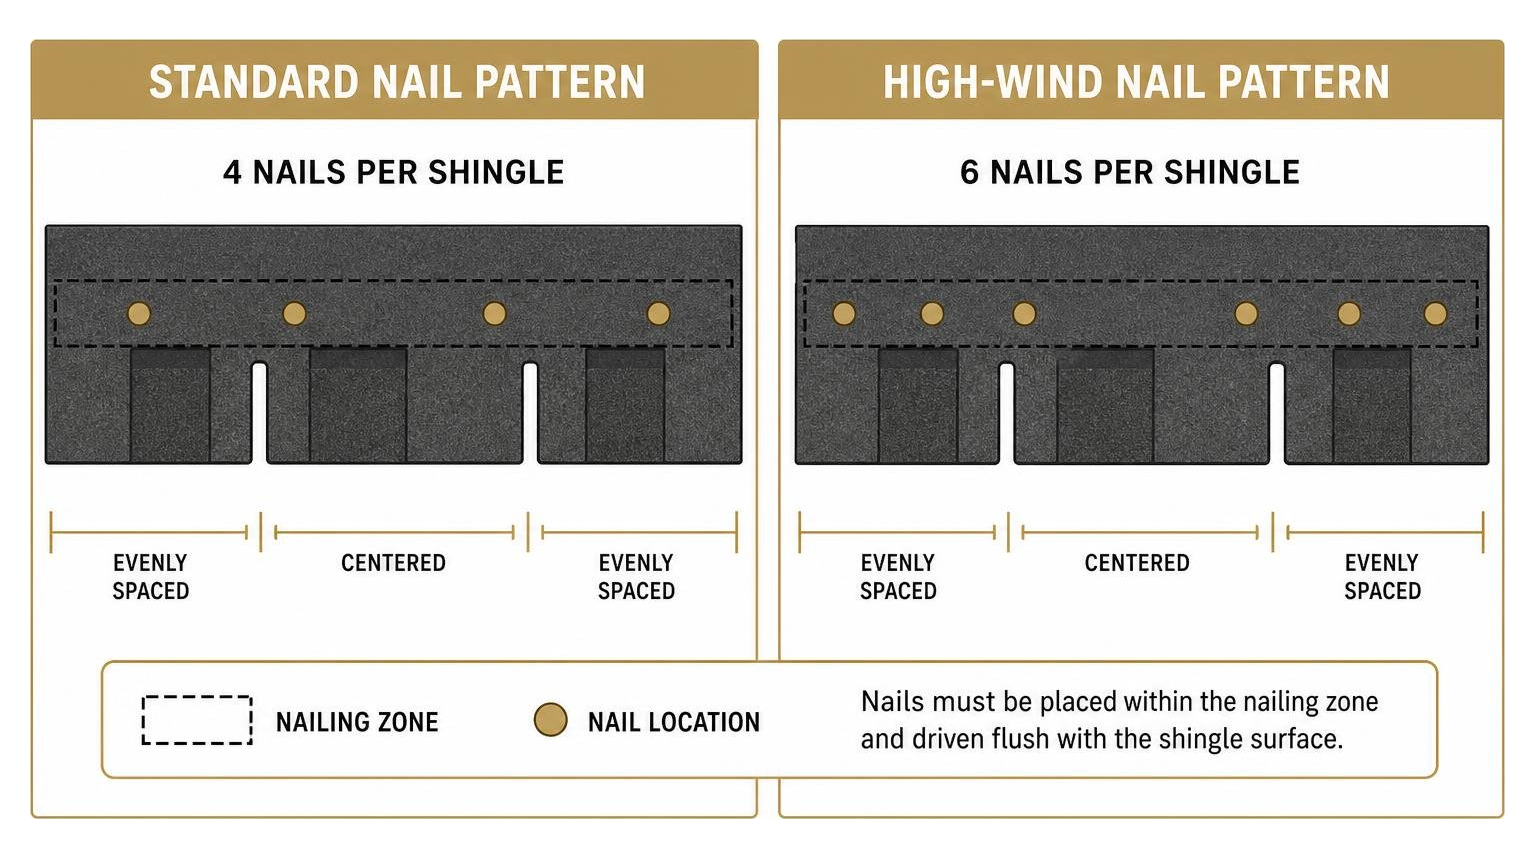
Key professional quality-control items include:
- Fastener Specifications: 12-gauge hot-dip galvanized steel nails with minimum 3/8-inch diameter heads are commonly required. Fasteners must achieve adequate penetration into sound wood decking or fully penetrate thinner sheathing when required by the manufacturer.
- Fastener Counts: Standard applications commonly use 4 nails per shingle, while high-wind zones and enhanced wind warranties can require 6 nails per shingle within the designated nailing zone.
- Drive Depth Precision: Pneumatic nail guns must be calibrated so nail heads sit flush with the shingle surface. Overdriven nails can cut through the fiberglass mat, while underdriven nail heads can create raised pressure points beneath the next shingle layer.
To understand traditional three-tab patterning differences at a general level, see our resource on Installing 3 Tab Asphalt Shingles.
Valley Flashing and Wall Penetration Details
Valleys, walls, pipe penetrations, and vents are among the highest-risk leak locations on an asphalt shingle roof. These areas concentrate water flow and are heavily scrutinized during professional inspections, insurance reviews, and warranty evaluations.
Common professional considerations include:
- Open Metal Valleys: In high-rainfall regions like South Texas, open valley systems using W-profile galvanized steel or aluminum flashing over self-adhering membrane are often preferred for heavy water flow and debris movement. The valley design should match roof pitch, drainage volume, and manufacturer requirements.
- Step Flashing at Walls: Where the roof field meets vertical side walls, individual L-shaped metal step flashing pieces are commonly specified at a minimum of 5 inches tall by 5 inches wide. Properly integrated step flashing allows the roof and wall assemblies to move independently while directing water away from the joint.
- Penetration Boots & Vents: Plumbing stack vents and attic exhaust vents require compatible flashing pans, rubber boots, sealants, and shingle integration that can withstand UV exposure, thermal cycling, and wind-driven rain.
For additional technical specifications on complex wall transitions, consult the Roofing Installation Guide.
Hip and Ridge Cap System Requirements
The hip and ridge cap system seals the highest roof intersections against wind and water intrusion while supporting attic exhaust ventilation when ridge vents are used. Because these components are highly exposed to uplift forces and UV degradation, they should be evaluated as part of the complete roof system rather than treated as simple trim pieces.

Professional ridge cap review typically considers:
- Whether purpose-made hip and ridge cap shingles are used instead of improvised field-shingle pieces that may crack or fail prematurely.
- Whether the layout accounts for prevailing wind exposure and manufacturer fastening requirements.
- Whether cap exposure, alignment, and ventilation openings are consistent across the ridge.
- Whether exposed fasteners, end caps, and transition points are sealed with compatible roofing sealants approved for the system.
Climate Adaptations and Disaster Resilience
Roofing systems in Texas face aggressive environmental demands, including San Antonio heat and UV load, extreme thermal expansion, localized spring hail, high winds, and hurricane-force gust potential. A roof that meets only the bare minimum may still be vulnerable if the property has complex roof geometry, poor attic ventilation, aging decking, or prior storm damage.
To support wind-load performance under ASTM D7158 or ASTM D3161 Class H ratings, professional roof specifications may be upgraded beyond basic minimum standards. These upgrades should be selected by a qualified contractor based on roof slope, manufacturer requirements, permit requirements, exposure category, and insurance documentation needs.
| Feature | Standard Installation Standards | High-Wind & Coastal Resilience Standards |
|---|---|---|
| Fastener Count | 4 nails per shingle | 6 nails per shingle within marked nail zone |
| Nail Placement | Standard manufacturer nailing zone | Enhanced high-wind nailing strip when required |
| Starter Strip Edge | Standard self-seal strip | Enhanced perimeter sealing when specified |
| Valley System | Closed-cut valley | Open W-metal channel with self-adhering ice/water membrane |
| Underlayment | Single approved underlayment layer | Double synthetic layer or fully adhered self-stick membrane where required |
| Fastener Metal | Electro-galvanized | Hot-dip galvanized or stainless steel near corrosive exposure |
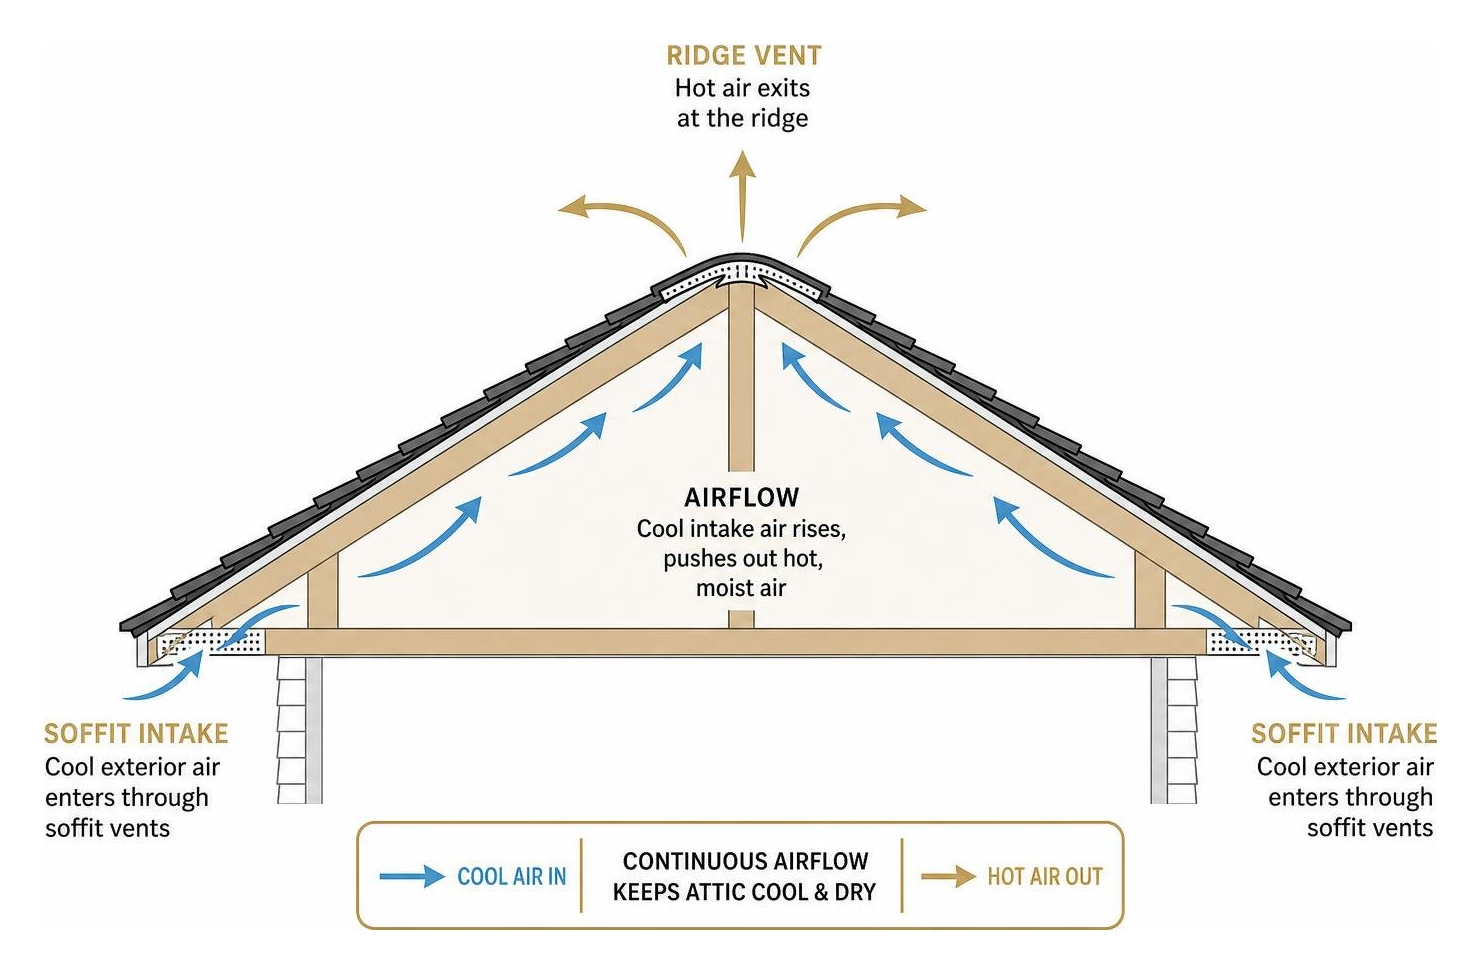
Attic ventilation plays an essential role in system longevity. Unbalanced attic ventilation traps extreme solar heat beneath the roof deck during Texas summers, accelerating granule loss, blistering, adhesive degradation, and premature shingle aging. Code commonly requires a minimum of 1 square foot of net free ventilating area (NFVA) for every 300 square feet of attic floor area, balanced between lower soffit intake vents and upper ridge exhaust vents.
For a deeper dive into regional material selection, review our guide on Asphalt Shingles Installation.
Cold Weather Asphalt Shingles Roof Installation Best Practices
Although warmer weather dominates South Texas, unexpected winter freezes occur. When ambient temperatures drop below 40 F (4 C), asphalt shingles lose flexibility and become brittle, increasing the risk of cracking during handling or fastening.
Professional cold-weather quality controls focus on protecting material integrity and warranty compliance. These controls may include conditioned material storage, limited rooftop staging, manufacturer-approved hand-sealing where natural thermal activation is delayed, and careful nailer pressure monitoring to avoid damaging cold shingle mats. These measures are especially important after winter storm events, when homeowners may be managing insurance claims, permit requirements, and urgent leak concerns at the same time.
Frequently Asked Questions
What is the minimum slope required for asphalt shingles?
Asphalt shingles require a minimum roof slope of 2:12 (a 2-inch vertical rise per 12 inches of horizontal run). On slopes between 2:12 and 4:12, a double layer of underlayment or a single layer of self-adhering waterproofing membrane must be installed across the entire roof deck. Slopes below 2:12 are unsuitable for asphalt shingles and require low-slope membrane roofing systems.
How many nails per shingle are needed in high-wind areas?
High-wind regions—such as areas with design wind speeds exceeding 110 mph—require six nails per shingle. Fasteners must be placed within the manufacturer’s designated nailing zone to achieve maximum wind resistance ratings (ASTM D7158 Class H).
What are the most common installation mistakes that void roof warranties?
The three most common installation mistakes that cause premature roof failures and void manufacturer warranties are:
- Omitting starter strips along eave and rake edges.
- Improper fastener depth and placement, such as overdriving nail heads through the fiberglass mat or placing nails above the designated nail line.
- Inadequate attic ventilation, which leads to excessive heat retention under the roof deck.
Conclusion
Executing a code-compliant roof replacement requires structural knowledge, precise material placement, and adherence to safety protocols. From deck inspection to ridge cap sealing, every component functions as part of a complete system designed to shield the building interior against severe Texas weather events.
Improper fastener depth, missing starter strips, or poor flashing installation can lead to interior leaks, structural rot, and voided manufacturer warranties. Homeowners and property managers should consult licensed professionals to handle complex roof system upgrades safely and effectively.
For certified, code-compliant roof installations backed by transparent communication and robust warranties across San Antonio, Boerne, New Braunfels, Bulverde, and Alamo Heights, visit our Residential Asphalt Shingle Roofing Services page. Contact Apex Roofing & General Contractors today at (726) 727-7663 to request your free estimates and schedule a free inspection.