What to Do When Your Clay Tile Roof Is Leaking
Clay tile roof leak repair is one of the most urgent home maintenance tasks you can face — water gets in fast, and the damage spreads faster.
Here’s what to do right now:
- Check your attic or ceiling for water stains, damp insulation, or active drips
- Do not walk on the tiles — clay tiles crack easily under direct foot pressure
- Protect the interior — place a tarp or buckets under any active drips
- Call a trusted roofing contractor to inspect the roof safely and identify the true source of the leak
- Do not patch over the top — sealing the tile surface does not fix what’s failing underneath
Most tile roof leaks are not caused by the tiles themselves. The real culprit is almost always failed underlayment or damaged flashing hidden beneath the tiles.
Here’s the thing most homeowners don’t realize: your clay tiles can look perfectly intact from the ground while water is silently destroying the roof deck below. By the time you see a stain on your ceiling, the damage is already done.
Clay tile roofs are built to last 50 years or more — but the materials underneath them are not. Underlayment typically fails after 15 to 20 years, especially in hot climates. Flashing around chimneys, valleys, and vents is another common failure point. Neither problem is visible without getting on the roof and lifting tiles.
I’m Carlos Yzaguirre, President of Apex Roofing & General Contractors in San Antonio — and our team handles clay tile roof leak repair across Texas, from straightforward single-tile replacements to full underlayment restoration. In this guide, I’ll walk you through exactly how to identify, repair, and prevent clay tile roof leaks so you can make confident decisions about your home.

Clay tile roof leak repair basics:
Understanding the Need for Clay Tile Roof Leak Repair
To understand why a clay tile roof leaks, you have to understand how the system is engineered. A clay tile roof is actually a two-part water-shedding system. The tiles themselves act as a highly durable primary shield, shedding the vast majority of rain, wind, and sun. However, clay tiles are naturally porous and are not designed to be 100% waterproof. The true waterproofing system of your roof is the underlayment membrane installed directly onto the wooden roof deck beneath the tiles.

In hot climates like San Antonio, Texas, the underlayment faces extreme environmental stress. Daily temperature swings of 40 to 50 degrees cause the roof to expand and contract—a process known as thermal cycling. Over 15 to 20 years, this constant movement, combined with intense heat radiating from the underside of the tiles, bakes the underlayment until it becomes brittle, cracks, and fails.
When tiles crack, slip, or break, rainwater flows directly onto this weakened underlayment, quickly finding its way into your home. For a deep dive into how these systems fail and how to diagnose them, consult Clay Tile Roof Damage, Leaks, or Wear: inspection, causes, cures and explore our guide on Why Is My Roof Leaking? Causes and Effective Roof Leak Repair Strategies to Protect Your Home.
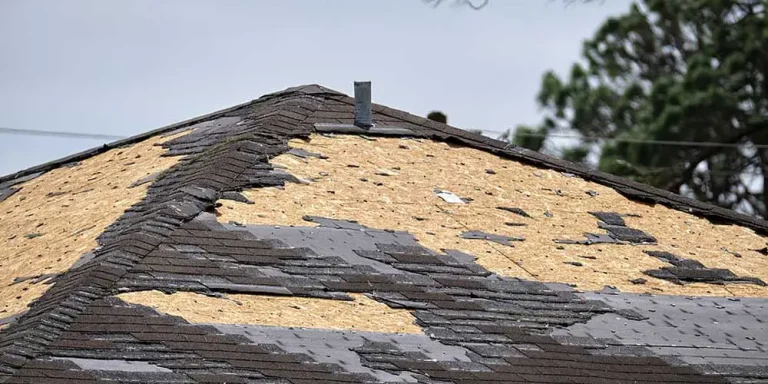
Visual Indicators of a Clay Tile Roof Leak Repair Need
Catching a tile roof leak early can save you thousands of dollars in structural repairs. Homeowners should look out for several key warning signs:
- Water Stains and Damp Spots: Dark, spreading stains on your ceilings or high on interior walls are the most obvious signs of an active leak.
- Lime Bloom and Efflorescence: A chalky white residue on the underside of your tiles or along your eaves indicates that water is consistently soaking through the tiles, leaching out minerals as it evaporates.
- Slipped or Displaced Tiles: Clay tiles can slide out of place if their fasteners corrode or break. A single slipped tile exposes the vulnerable underlayment directly to the sun and rain.
- Cracked or Chipped Tiles: Visible cracks from storm impact or previous foot traffic allow water to bypass the protective tile layer entirely.
- Eave Stains and Rot: Water pooling at the lower edges of your roof will rot the fascia boards and leave unsightly stains along your eaves.
If you notice any of these warning signs, refer to our comprehensive Roof Leak Repair Guide to assess the urgency of your situation.
Tracing the Source: The Look Uphill Rule
Finding the entry point of a roof leak is rarely as simple as looking directly above the ceiling stain. Because water follows gravity and the path of least resistance, it will often enter through a gap high up on the roof, run down a rafter, and drip onto your ceiling feet away from the actual leak source.
To find the true source, professionals use the “Look Uphill” rule. When inspecting your attic or roof, trace any visible moisture trails upward toward the ridge line.
- Attic Inspection: On a rainy day, head into your attic with a strong flashlight. Look for wet rafters, damp insulation, or rusted nails. Trace the water trails uphill to locate the penetration point.
- The Hose Test: If the weather is dry, you can perform a hose test. With one person stationed inside the attic with a flashlight, a second person on the ground gently runs a garden hose over specific sections of the roof, starting at the lowest point and slowly moving upward until the helper inside spots water trickling through.
For leaks occurring near roof valleys—where two roof slopes meet—special care must be taken. Learn more about diagnosing these tricky areas in our guide on Stop the Flow with These Tips for Fixing a Leaking Roof Valley.
Step-by-Step Guide to Replacing a Broken Clay Roof Tile
Replacing a single broken or cracked clay tile is a highly effective localized repair, provided the underlying underlayment is still in good condition. However, because clay tiles are brittle, you must use the proper tools and safety equipment to avoid causing further damage.
For historic properties, matching the original installation methods is crucial to preserving the roof’s structural integrity. You can read more about these specialized standards in the Repair of Historic Clay Tile Roofs.
Before beginning, gather the essential tools required for the job:
- Sturdy extendable ladder
- Safety harness and roof anchor
- Soft-soled, high-traction shoes
- Two wooden wedges
- Flat pry bar or tile ripper
- Replacement clay tiles (matching your existing profile and color)
- Corrosion-resistant copper or galvanized nails
- Stainless steel tile clips or wire
- High-grade silicone roofing sealant
Executing a DIY Clay Tile Roof Leak Repair for Single Tiles
If you are comfortable working at heights and have taken all necessary safety precautions, you can replace a broken tile by following these steps:
- Distribute Your Weight: Never step directly on the center or delicate edges of clay tiles. If you must walk on the roof, step only on the lower three inches (the head-lap) of the tiles where they overlap and are supported by the structure underneath. Better yet, lay down plywood walkways padded with foam to distribute your weight evenly.
- Lift the Overlapping Tiles: Gently slide two wooden wedges under the tiles directly above and to the left of the broken tile. This relieves the pressure and gives you room to work.
- Remove the Broken Tile: Use a flat pry bar or tile ripper to reach under the broken tile, hook the nail holding it in place, and carefully pry or pull the nail out. Carefully slide the broken pieces of the tile out of the roof.
- Inspect and Patch the Underlayment: With the tile removed, inspect the exposed underlayment. If you see small tears or cracks, apply a patch of high-grade self-adhering waterproofing membrane over the area, sealing the edges with silicone sealant.
- Install the Replacement Tile: Slide a stainless steel tile clip onto the batten or secure it to the deck. Apply a small bead of silicone sealant to the underside of the replacement tile where it will overlap the tile below. Carefully slide the new tile into place, ensuring it hooks securely onto the tile clip or nail.
- Remove the Wedges: Gently lower the surrounding tiles back into place and remove your wooden wedges.
For more information on tile profiles and proper spacing during installation, see our detailed article on Tile Roof Installation: Your Guide to a Durable and Beautiful Roof.
Addressing Flashing and Underlayment Failures
While broken tiles are easy to spot, most severe clay tile roof leaks stem from flashing and underlayment failures. Flashing consists of metal strips installed at roof intersections, valleys, chimneys, and pipe penetrations to direct water away from these vulnerable joints.

A common mistake in clay tile roof repair is using asphalt-based roofing cement as a stopgap patch over metal flashing. Asphalt cement dries out, shrinks, and cracks under the intense Texas sun. Worse, the chemical composition of asphalt can actually corrode copper and lead-coated copper flashings over time, turning a minor issue into a major structural leak.
To learn more about why these temporary patches fail and how to avoid them, read about Clay Tile Roof Flashing Leaks.
Repairing Valley and Penetration Flashing
Repairing flashing on a clay tile roof requires removing the surrounding tiles to expose the metal underneath.
- Valley Flashing: Roof valleys channel massive amounts of water during heavy downpours. If valley flashing rusts through or is installed improperly, water will bypass the tiles entirely. Repairing this requires lifting all tiles along the valley, replacing the worn metal with high-quality, corrosion-resistant copper or pre-painted steel, and laying down a fresh layer of self-adhering membrane underneath.
- Penetrations and Chimneys: Flashing around chimneys and vents consists of two parts: step flashing (which goes under the tiles) and counter flashing (which is embedded into the chimney mortar joints). If the sealant or mortar fails, water slips behind the flashing.
- Skylights: Skylights are notoriously prone to leaks if their perimeter seals degrade. If you suspect your skylight flashing is failing, consult The Clear Guide to Skylight Seal Repair for specialized repair steps.
Restoration vs. Replacement: Cost and Decision Guide
When facing widespread underlayment failure or multiple cracked tiles, homeowners must decide between a targeted restoration (also known as a lift and relay) and a full roof replacement.
- Tile Restoration (Lift and Relay): Because clay tiles can easily last 100 years, they often outlive their underlayment by decades. In a lift and relay, professional roofers carefully remove all your existing tiles, stack them safely, tear off the failed underlayment, install a brand-new, high-temperature underlayment, and then reinstall your original clay tiles. This process saves you thousands of dollars in material costs while giving you a completely waterproof roof.
- Full Roof Replacement: If your clay tiles are extremely old, brittle, or have suffered severe storm damage, they may crack when handled. In this case, a full replacement with new tiles is the most cost-effective long-term option.
Roofers often use the 50% rule to guide this decision: if the cost of repairing and restoring your current roof exceeds 50% of the cost of a full replacement, investing in a new roof is generally the smarter financial choice.
| Option | Average Lifespan | Key Benefits | Best For |
|---|---|---|---|
| Lift and Relay (Restoration) | 20–30 years (new underlayment) | Saves tile material costs; preserves historic look | Roofs with sound tiles but failed underlayment |
| Full Roof Replacement | 50+ years | Brand-new warranty; updated aesthetics; maximum durability | Brittle, severely damaged, or low-quality tiles |
Cost Breakdown of Tile Roof Repairs in 2026
Tile roof repairs require highly specialized labor and materials, making them more expensive than standard asphalt shingle repairs. In 2026, typical tile roof repair costs range from $900 to $2,500, with most homeowners paying around $1,700 for moderate leak repairs.
- Labor Costs: Professional tile roof repair labor ranges from $50 to $120 per hour, or $5 to $15 per square foot, depending on the slope and complexity of the roof.
- Minor Repairs (1–3 tiles): $300 to $1,000.
- Moderate Repairs (Flashing or valley repair): $1,200 to $4,000.
- Widespread Underlayment Repair (Lift & Relay): $5,000 to $15,000 depending on roof size.
- Full Tile Roof Replacement: $10,000 to $30,000+.
If you are looking for local pricing and professional assistance in the San Antonio area, visit our San Antonio Roofers page and check out our dedicated guide on Roof Repair San Antonio.
Frequently Asked Questions About Clay Tile Roofs
Can you walk on a clay tile roof safely?
No, you cannot walk on a clay tile roof safely without proper training and specialized equipment. Clay tiles are highly brittle and will crack under direct body weight, especially if stepped on near the center or edges. If walking on the roof is absolutely necessary, professionals step only on the lower three inches of the tiles where they overlap the structure below, or use padded plywood walkways to distribute their weight evenly across multiple tiles.
How long does clay tile roof underlayment last?
While clay tiles themselves can easily last 50 to 100 years, the underlayment underneath typically lasts only 15 to 20 years in hot, sunny climates like San Antonio. Over time, the intense heat radiating from the tiles bakes the underlayment, causing it to dry out, crack, and lose its waterproofing capabilities.
Will homeowners insurance cover clay tile roof leak repair?
Homeowners insurance typically covers clay tile roof repairs if the damage was caused by a sudden, covered peril, such as hail, high winds, or falling tree limbs. Insurance does not cover repairs for leaks caused by normal wear and tear, lack of maintenance, or underlayment that has simply reached the end of its natural lifespan.
Conclusion
A clay tile roof is a beautiful, highly durable investment that can protect your home for generations—but only if you address leaks and underlayment wear early. Ignoring a minor leak today can lead to rotting wood decks, mold growth, and incredibly costly structural damage tomorrow.
Because working on clay tiles requires specialized knowledge, safety gear, and an understanding of local building codes, DIY repairs should be limited to simple, single-tile replacements on low slopes. For anything involving flashing, valleys, or widespread underlayment issues, always hire a certified professional.
If you suspect your roof has a leak or is ready for an inspection, our team at Apex Roofing & General Contractors is here to help. We offer free estimates to help you plan your repairs with confidence. Schedule a professional roof repair online or call us today at (726) 727-7663 for a free inspection to keep your home dry and secure.