Why Installing 3 Tab Asphalt Shingles is the Smart DIY Choice
Installing 3 tab asphalt shingles is one of the most straightforward roofing projects for homeowners who want to tackle their own roof work. Here’s what you need to know:
Essential Steps for Installing 3 Tab Asphalt Shingles:
- Prepare the roof deck – Remove old shingles, check for damage, ensure clean surface
- Install underlayment – Lay synthetic felt with 4-inch overlaps from eave to ridge
- Add drip edge – Install at eaves first, then rakes after underlayment
- Place starter strips – Create foundation course with adhesive strip facing down-slope
- Install field shingles – Use 5-inch exposure, 6-inch offsets, 4 nails per shingle
- Flash penetrations – Add step flashing at walls, pipe boots at vents
- Finish ridge and hips – Cut tabs for caps, seal exposed nails
These 3-tab shingles are popular because they cost just $3.50 to $5.50 per square foot and typically last 15-20 years when properly installed. A typical 1,500-square-foot roof can be completed in about two days with basic tools and careful planning.
The hot San Antonio climate makes proper installation even more critical. Texas heat can cause shingles to become brittle if handled incorrectly, and our occasional severe weather demands secure fastening with the right nail patterns.
As Carlos Yzaguirre, President of Apex Roofing & General Contractors, I’ve overseen countless installing 3 tab asphalt shingles projects across San Antonio and the Hill Country since co-founding our company in 2022. My experience has shown that while DIY installation is possible, understanding the fundamentals prevents costly mistakes that could compromise your roof’s integrity.

Installing 3 tab asphalt shingles terms at a glance:
- asphalt shingles installation
- replacing asphalt shingle roof
- replacing asphalt shingles with metal roof
Roofing Basics: Why 3-Tab Shingles Still Rock
Let’s be honest — when most people think “roofing,” they picture those classic three-tab shingles that have protected American homes for decades. Installing 3 tab asphalt shingles remains the go-to choice for homeowners across San Antonio and the Hill Country because they balance value and durability.
What makes these workhorses special? A single-layer design keeps costs low, while the fiberglass mat core delivers flexibility that stands up to South-Texas temperature swings. Each shingle is 36 inches long with three 12-inch tabs that create a clean, uniform look, and most carry a UL Class A fire rating for maximum safety.
At only $3.50 – $5.50 per square foot, 3-tab shingles are far cheaper than architectural alternatives yet still deliver a reliable 15-20 year lifespan when installed correctly. Modern manufacturing has also boosted their wind resistance, an important upgrade for our occasional Hill Country storms.

Popularity & Lifespan Stats
Across North America, 3-tab shingles still cover a majority of residential roofs because they simply make economic sense. A typical 1,500 sq ft roof can be finished in about two days by an experienced crew, making the material a realistic option for attentive DIYers as well. Just remember: proper nailing, flashing, and ventilation are non-negotiable in the San Antonio climate.
If you’re considering a roof replacement or need professional roof installation guidance, schedule a free estimate through our website. Apex Roofing & General Contractors will help you decide whether 3-tab shingles are the best match for your home and budget.
Tools, Materials & Safety Prep
Getting ready for installing 3 tab asphalt shingles means more than just buying shingles and hoping for the best. Trust me, there’s nothing worse than being halfway up a roof and realizing you forgot something crucial – or worse, cutting corners on safety.
Let’s start with the tools that’ll make your life easier. A chalk line is your best friend for keeping courses straight, while a pneumatic roofing nailer will save your arm from the repetitive hammering. If you’re going old-school with a hammer, make sure it’s a proper roofing hatchet with a gauge for consistent nail depth. You’ll also need a sharp utility knife (buy extra blades – trust me), tin snips for cutting drip edge metal, and a speed square for clean cuts.
For materials, stick with 10-12 gauge galvanized nails with 3/8-inch heads – they won’t rust or blow out in San Antonio’s wind. Your roof deck needs protection, so plan for synthetic felt underlayment (it’s worth the extra cost over felt paper) and ice-water shield for valleys and problem areas. Don’t forget the finishing touches: drip edge for clean edges and roofing cement for those final seals.
Now here’s where I get serious – safety isn’t optional. OSHA’s 6-foot rule means if you’re working more than six feet off the ground, you need fall protection. That means a full-body harness, proper roof brackets, and planks that won’t shift under your weight. Add non-slip shoes, a hard hat, safety glasses, and work gloves to round out your personal protection equipment.

After years of professional roof installations across the San Antonio area, I’ve seen too many preventable accidents. If you don’t have proper safety equipment or feel uncomfortable with heights, there’s no shame in calling professionals. Your family needs you in one piece more than they need the money you might save.
Material Checklist & Quantities
Getting your material calculations right the first time saves money and frustration. Here’s the math that actually works in the real world.
Start by measuring each roof section carefully – width times length for each area. Add everything together, then divide by 100 to get your total squares. Multiply by three for the number of shingle bundles you need, then add 15-20% for waste, cuts, and the inevitable “oops” moments.
Starter strip rolls need to cover your entire eave and rake perimeter. Many experienced roofers prefer cutting their own starter strips from regular shingles rather than buying pre-made ones – it’s often cheaper and you get better control over the process.
For ridge cap bundles, measure your total ridge and hip length, then divide by 35 linear feet per bundle. Round up because running short on ridge caps when you’re almost done is particularly annoying.
Ventilation hardware depends on your specific roof, but plan for proper intake and exhaust. In Texas heat, good ventilation isn’t just nice to have – it’s essential for your shingles’ lifespan and your energy bills.
If these calculations feel overwhelming, our team at Apex Roofing can help you get accurate material estimates. We’ve been serving San Antonio and the Hill Country since 2022, and we know exactly what local roofs need.
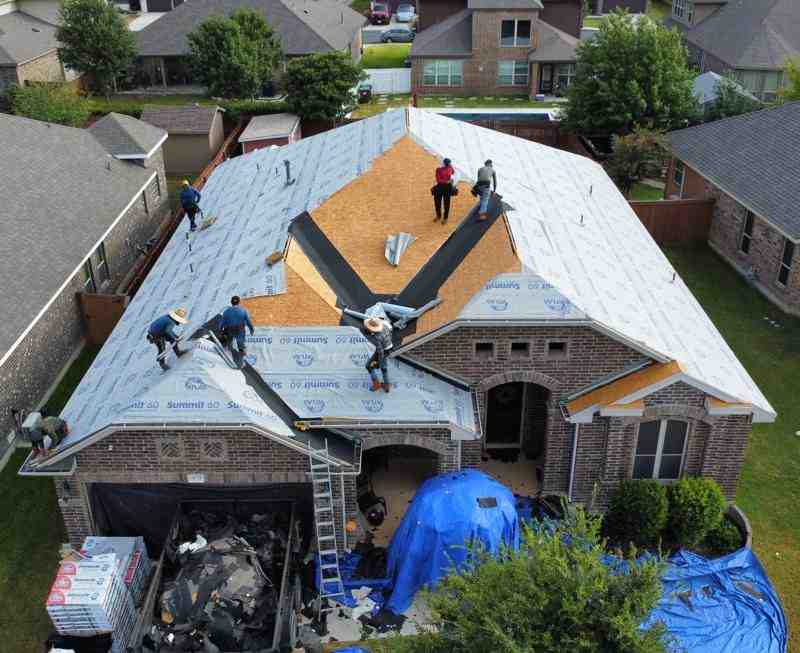
Installing 3 Tab Asphalt Shingles: Step-By-Step Walkthrough
Now we’re getting to the heart of installing 3 tab asphalt shingles. This systematic approach follows proven industry practices and local building codes to ensure your roof protects your home for decades to come.
Think of this process like building a house – you start with a solid foundation and work your way up. Each step depends on the one before it, so resist the temptation to skip ahead or take shortcuts. The key principle is simple: water flows downhill, and proper overlap keeps it flowing where it should.
Preparing the Roof Deck
Your roof deck is like the canvas for a painting – it needs to be clean, smooth, and ready for what comes next. Start by stripping off all old shingles, nails, and debris. Here’s a pro tip: use a magnet to sweep up stray nails. Trust me, your car tires (and your neighbors) will thank you later.
Once everything’s clean, put on your detective hat and inspect every inch of that deck. Look for rotten or damaged boards that need replacement – they’ll feel soft or spongy underfoot. Check for loose panels that need re-nailing, and watch for gaps between boards wider than 1/4 inch.
The deck must be bone dry before you start installing 3 tab asphalt shingles. Any trapped moisture becomes a ticking time bomb for rot and premature failure. In San Antonio’s humid climate, this is especially critical during our steamy summer months.
Underlayment & Drip Edge Setup
Getting the underlayment right is like wearing a raincoat under your jacket – it’s your backup protection when things get rough. We always recommend synthetic felt over traditional asphalt-saturated felt because it’s tougher, lasts longer, and gives you better footing during installation.
Here’s where sequence matters big time. Install drip edge at the eaves first, before the underlayment goes down. Then lay your underlayment with 4-inch overlaps, working from bottom to top. Finally, install drip edge at the rakes after the underlayment is in place.
This specific order ensures water can’t sneak behind the drip edge – a common mistake that causes major headaches down the road. Start at the bottom and work your way up, overlapping each course by at least 4 inches.
Starter Strips & First Course
The starter strip is your foundation course, and like any foundation, it deserves your full attention. You can buy pre-made starter strips or cut your own from full shingles. We prefer making our own because it’s more economical and often provides better wind resistance.
Creating starter strips from 3-tab shingles is straightforward: cut off the tabs to leave just the top portion, then position with the adhesive strip facing down-slope. Create a 3/4-inch overhang at both eaves and rakes, and nail just below the adhesive strip.

The first course of full shingles goes directly over the starter strip. Here’s a crucial detail: offset the seams so they don’t line up with the starter strip joints. This prevents water from finding a straight path through your roof during those intense San Antonio thunderstorms.
Laying and Aligning: Installing 3 Tab Asphalt Shingles Like a Pro
This is where installing 3 tab asphalt shingles becomes both science and art. Proper exposure and alignment create a roof that’s both watertight and beautiful to look at.
The magic numbers to remember are 5-inch exposure (the distance from the bottom of one course to the bottom of the next), 6-inch horizontal offset between courses, and 1/2-inch clearance above cutout slots for nail placement.
Snap horizontal chalk lines at 5-inch intervals to guide each course. This keeps your lines straight even if your eaves aren’t perfectly level – and let’s be honest, they rarely are. Many experienced roofers also snap vertical bond lines to maintain consistent offsets.
The racking method works beautifully for 3-tab installation. Start with a full shingle at one end, then begin the next course with a shingle cut 6 inches shorter. Continue this pattern, creating a diagonal installation that prevents those awkward narrow pieces at the rake edges.
Installing Flashing & Valleys
Flashing is where many DIY jobs go sideways. It’s not glamorous work, but proper flashing installation separates the pros from the amateurs.
For step flashing at walls, use pieces that are at least 2 inches wider than your shingle exposure. Each piece should extend at least 4 inches up the wall and 4 inches onto the roof. Embed each piece in roofing cement and make sure the next course of shingles covers the lower portion.
Valley installation deserves special attention. We recommend open valleys with metal liners for maximum longevity. Install a 24-inch wide valley liner, center it perfectly, and secure along the edges. Trim shingles to create a 6-inch wide channel at the top that expands to 8 inches at the bottom.
Nailing Best Practices
Proper nailing is absolutely crucial for wind resistance and longevity. Use 10-12 gauge galvanized nails with 3/8-inch heads that penetrate at least 3/4 inch into the deck.
Place four nails per shingle in normal conditions, bumping up to six nails per shingle in high-wind areas. Position nails 1 inch from each end and place the remaining nails above each cutout, driving them 1/2 inch above the cutout slots.
Never nail through the adhesive strip – this prevents proper sealing. In cold weather below 40°F, hand-seal each tab with small dabs of roofing cement since the factory adhesive won’t activate in cold temperatures.
Ridge & Hip Finish: Final Steps in Installing 3 Tab Asphalt Shingles
The ridge and hip caps are your roof’s crown jewel. Cut individual caps from 3-tab shingles by cutting along the tab lines. Each cap should measure about 12 inches long.
Start installation at the end opposite the prevailing wind direction. In San Antonio, this usually means starting at the east end since our prevailing winds come from the southeast. Install caps with a 5-5/8 inch reveal, nailing each cap with two nails positioned 1 inch from each edge and 5-1/2 inches from the exposed end.
Cover all exposed nails with roofing cement to prevent leaks. This final step gets overlooked more often than you’d think, but it’s critical for long-term performance.
Post-Install Care: Ventilation, Inspection & Maintenance
Congratulations! You’ve finished installing 3 tab asphalt shingles, but your roof care journey is just beginning. Think of maintenance like regular oil changes for your car – a little attention now prevents expensive problems later.
The first few months after installation are especially important. Your shingles need time to settle and seal properly, particularly in San Antonio’s variable weather. During this period, it’s normal to see a few granules in your gutters as the shingles adjust to their new environment.
Set up a twice-yearly inspection routine – once in spring before storm season, and again in fall before winter. These don’t need to be complicated affairs. Walk around your house and look up at your roof from different angles. You’re checking for loose or missing shingles, damaged flashing, and any obvious problems.
From ground level, you can spot most issues without climbing onto the roof. Look for granule loss signs in your gutters – a few granules are normal, but excessive amounts might indicate premature wear. Check that your gutters and downspouts are clear of debris, as clogged drainage can cause water to back up under your shingles.
Pay special attention to areas around chimneys, vents, and where your roof meets walls. These spots handle the most stress and are where problems typically start. If you notice any loose flashing or cracked sealant, address it quickly with some roofing cement.

Hand-sealing touch-ups become important during cooler months. If you installed your roof when temperatures were below 60°F, some shingle tabs might not have sealed properly. On warm days, you can lift tabs gently and add small dabs of roofing cement to help them adhere.
Remove debris promptly, especially after storms. Tree branches, leaves, and other debris can trap moisture and cause premature deterioration. A leaf blower works great for this job, but be gentle around flashing and vents.
Proper attic ventilation continues to be crucial long after installation. Check your ridge and soffit vents periodically to ensure they’re not blocked by insulation, bird nests, or debris. Good airflow keeps your attic cooler in summer and prevents moisture problems year-round – both critical for extending your roof’s life in Texas heat.
If you notice any significant damage or aren’t comfortable with heights, don’t hesitate to call professionals. Our team at Apex Roofing provides comprehensive roof repair services throughout San Antonio and can address issues before they become major headaches. We offer free estimates and can be reached at (726) 727-7663 to schedule an inspection.
Common Mistakes & Pro Tips for San Antonio DIYers
After years of fixing DIY roofing mistakes across San Antonio and the Hill Country, I’ve seen the same errors pop up again and again. Most of these mistakes are completely avoidable with the right knowledge and a little extra care.
The biggest mistake I see? Skipping the underlayment entirely. Some homeowners think they can save time and money by installing shingles directly on the deck. This is a recipe for disaster, especially in Texas where our occasional severe storms can drive rain horizontally. Underlayment is your backup protection – never skip it.
Misaligned tabs are another dead giveaway of amateur work. Your roof should look like a professional installed it, with perfectly straight courses and consistent spacing. This is where those chalk lines become your best friend. Take the extra time to snap horizontal lines every 5 inches – your roof will thank you with decades of reliable service.
When it comes to installing 3 tab asphalt shingles in San Antonio’s climate, timing matters more than you might think. Our intense summer heat can make shingles so hot they’re difficult to handle and prone to damage. Store your shingles in the shade and plan your installation for early morning or late afternoon during the hottest months.
Nailing mistakes are particularly costly. Insufficient nails might save you a few minutes, but they’ll cost you when the next storm hits. We’ve seen too many roofs with shingles scattered across the yard because someone used three nails instead of four. On the flip side, overdriving nails creates tiny holes that can become big leaks over time. The nail head should sit flush with the shingle surface – no deeper.

Excessive overhang is another common error that looks minor but creates major problems. More than one inch of overhang at the eaves or rakes gives wind something to grab onto. During our spring storm season, this can lead to catastrophic failure where entire sections of roofing peel away.
The truth is, while installing 3 tab asphalt shingles is definitely doable for experienced DIYers, there’s a fine line between a challenging project and a dangerous one. If you’re dealing with a complex roof design, multiple valleys, or extensive storm damage repair, it might be time to call in the professionals.
At Apex Roofing & General Contractors, we’ve built our reputation on fixing these exact mistakes across San Antonio and surrounding areas. Sometimes the most cost-effective approach is getting it done right the first time. We offer free estimates and can help you determine whether your project is a good DIY candidate or needs professional roof installation services.
Frequently Asked Questions about 3-Tab Shingle Installation
After assisting hundreds of San Antonio homeowners, we notice the same questions again and again. Here are concise answers to the top concerns about installing 3 tab asphalt shingles.
How many nails per shingle do I really need?
Standard practice is four nails per shingle, but Central Texas wind events justify six nails. Place nails one inch from each end and just above the cutouts. Drive them flush—never over- or under-driven—to preserve the shingle’s seal.
Can I install new shingles over an old layer?
Local building codes may allow one overlay, yet Apex Roofing rarely recommends it. An additional layer hides deck damage and adds weight to your structure. A full tear-off lets you inspect decking, replace rotten wood, and install fresh synthetic underlayment for maximum longevity.
When should I replace my 3-tab roof?
Plan for replacement when you see any of these signs:
- Significant granule loss filling gutters
- Widespread curling or cracking
- Multiple active leaks
- Age approaching 20 years, even if problems aren’t obvious
Severe hail or wind can also shorten service life. For an unbiased opinion, request a complimentary roof inspection through our contact form. Our certified team will outline the most cost-effective path—repair or full roof replacement.
Conclusion
Installing 3 tab asphalt shingles is absolutely within reach for disciplined DIYers who respect safety protocols and pay attention to detail. Still, roofing mistakes can lead to costly leaks and voided warranties, so don’t hesitate to bring in the experts for tricky elements like valleys, chimneys, or complex roof geometry.
Apex Roofing & General Contractors proudly serves homeowners throughout San Antonio, Helotes, Leon Valley, Alamo Heights, Fair Oaks Ranch, Shavano Park, Terrell Hills, and all of Bexar County. Whether you need a full roof replacement, targeted storm-damage repair, or simply want a professional review of your DIY work, our crew delivers certified workmanship and transparent communication.
Ready to protect your home with a roof that’s built to last? Reach out today to schedule a free inspection and estimate with the trusted team at Apex Roofing & General Contractors.