Why a Single Missing Shingle Demands Your Immediate Attention
A strong windstorm can leave a roof shingle in your yard—a small sign of a problem that demands urgent attention. Learning how to repair blown off roof shingles is a crucial skill, as that single missing piece exposes your home’s underlayment to water damage, rot, and mold. The good news is that a prompt DIY fix can prevent thousands in damage. At Apex Roofing & General Contractors, we believe in empowering homeowners with the knowledge to protect their investment. For San Antonio residents, knowing when to DIY versus calling for professional roof repair is key to navigating storm aftermath.
Quick Repair Steps:
- Assess the damage from the ground and gather supplies
- Lift the shingle above the damaged area with a pry bar
- Remove old nails and slide out the damaged shingle
- Slide in the new shingle, aligning it with surrounding ones
- Nail it down with four roofing nails below the sealant strip
- Apply roofing sealant under the tabs above to secure
As Carlos Yzaguirre, President of Apex Roofing & General Contractors, I’ve guided countless San Antonio homeowners through storm damage recovery. Our team has seen how a quick response to minor damage prevents major headaches down the road.

First Things First: Damage Assessment, Safety, and Supplies
Before you even think about climbing onto your roof, grab a pair of binoculars and do a thorough inspection from the safety of solid ground. This initial assessment is your first line of defense in determining whether you’re dealing with a simple fix or a sign of something more serious. At Apex Roofing, we always say that understanding the scope of work before you start is just as important as the repair itself.

Why Did My Shingles Blow Off?
Shingles don’t fly off without reason. The cause is often high winds (60+ mph), but other factors make roofs vulnerable. Improper installation—such as incorrectly driven nails or using staples—is a common hidden culprit. Age makes shingles brittle and less flexible. A new roof’s adhesive seal needs several weeks of sun to cure; a storm hitting before it bonds can easily lift shingles. Finally, underlying roof deck damage like rot can prevent shingles from securing properly, leading to recurring issues in the same spot. For a deeper look at storm damage, see our Storm Damage Roof Repair Complete Guide.
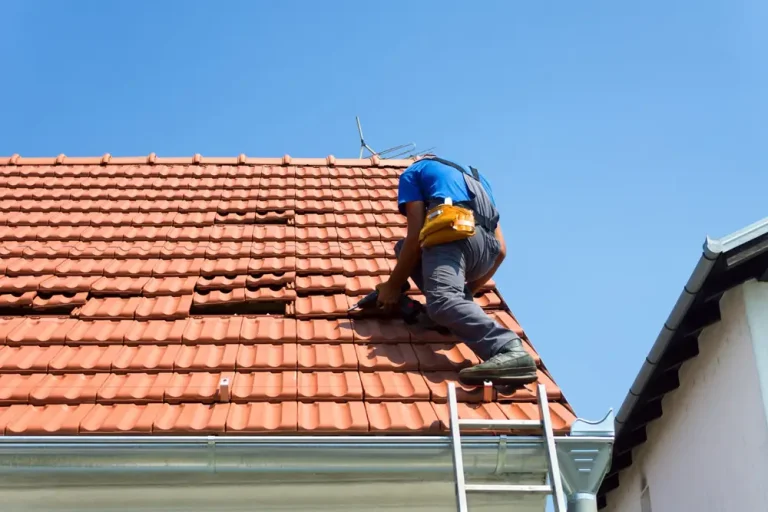
Safety Precautions for Working on a Roof
Working on a roof is dangerous. If you’re uncomfortable with heights or lack safety gear, call a professional. For those proceeding with a DIY repair, safety is paramount:
- Work on a calm, dry, and warm day. Warmth makes shingles pliable, and a dry surface prevents slips.
- Use a sturdy ladder that extends three feet above the roof edge and rests on level ground.
- Wear non-slip, soft-soled shoes for grip.
- A safety harness is essential for steep roofs. Anchor it securely.
- Never work alone. Have someone on the ground who can help in an emergency.
- Avoid stepping on soft or wet spots, which may indicate rotted decking.
Tools and Materials You’ll Need
Gathering your supplies first makes the job safer and smoother. You will need:
- Matching replacement shingles
- Hammer and a flat pry bar
- Utility knife
- 1 1/4-inch galvanized roofing nails
- Roofing sealant in a caulking gun
- Work gloves and safety glasses
Finding Matching Shingles
Finding a perfect shingle match can be tricky. Your best bet is to take a piece of the damaged shingle to a roofing supplier. You can also check the underside of a shingle for brand and color information. Be realistic: sun-fading means a perfect match on an older roof is unlikely. New shingles will look different at first but will fade over time. The goal is to match the type and size; a close color match is acceptable for a small repair.
The Step-by-Step Guide to How to Repair Blown Off Roof Shingles
With your supplies gathered and safety checks complete, you’re ready to tackle the repair. This is where we roll up our sleeves and get into the practical work of how to repair blown off roof shingles. The process requires patience and attention to detail, but it’s entirely manageable when you take it one step at a time.

How to Repair Blown Off Roof Shingles: The Replacement Process
Timing matters when replacing shingles. We recommend performing this repair on a warm, dry afternoon. The warmth makes shingles more pliable and less likely to crack when you’re working with them, and it helps the sealant cure properly.
Start by using your flat pry bar to gently lift the shingle tabs directly above the missing shingle. Slide the bar carefully under the overlapping row and apply gentle, even pressure to break the adhesive seal. Think of it like peeling a sticker—slow and steady wins the race. Older shingles can be brittle, so rushing this step risks cracking them.
Once you’ve lifted that upper row, you’ll see the nail heads securing the damaged shingle. These nails are your next target. Use the pry bar to carefully remove each nail from the damaged shingle’s top edge. Sometimes you’ll find four nails, sometimes six, depending on the installation method and local building codes.
With the nails removed and the adhesive broken, the damaged shingle should slide right out. If it’s being stubborn, there might be a hidden nail you missed or some particularly strong adhesive. Your utility knife comes in handy here for cutting away any stubborn bits or breaking remaining bonds.
Now slide your new shingle into place, making sure it aligns perfectly with the tabs of the adjacent shingles on both sides. This alignment is crucial—even a slight misalignment can create gaps where water can sneak through.
Secure the new shingle with four roofing nails positioned just below the sealant strip. Drive two nails on each side, placing them so the overlapping shingle above will cover them. Here’s a pro tip: if you’re nailing near an old hole, place the new nail slightly to the side rather than in the exact same spot. This gives you better holding power in fresh wood. Any unused nail holes should be filled with roofing cement to prevent water infiltration.
The final step is applying dabs of roofing sealant under the tabs of the shingle above. This re-establishes the waterproof bond that was broken when you lifted it. Press down firmly on the overlapping shingle to ensure good contact with the sealant. This adhesive bond is what keeps your roof watertight during driving rain.
How to Repair Curled Shingles
Curled shingles are often a sign of aging or poor attic ventilation, but they don’t always need full replacement. If the shingle isn’t cracked or extremely brittle, you can often coax it back into place and extend its life by several years.
Wait for a warm day when the shingles are naturally more flexible. Gently lift the curled edge—don’t force it or you’ll create a crack that wasn’t there before. Apply a thick bead of roofing sealant underneath using your caulking gun, being generous with the amount. You want complete coverage under that curled section.
Press the shingle down firmly to ensure the sealant makes good contact with the shingle below. Now here’s the trick: place a brick or weight on top and leave it there for 24 hours. This constant pressure ensures the shingle stays flat while the adhesive cures, forming a strong new bond. It might look a bit odd to have a brick on your roof for a day, but it’s worth it for a proper repair.
How to Repair Cracked or Torn Shingles
Small cracks or tears don’t necessarily spell doom for a shingle. If caught early and repaired properly, you can patch them up and prevent leaks without a full replacement.
Using a putty knife, carefully work roofing sealant into the crack or tear. You want the sealant to penetrate deep into the damaged area, not just sit on the surface. Press the two sides of the crack together firmly to create a solid bond.
Apply another thin layer of sealant over the top of the crack, feathering it out beyond the edges. This creates a protective barrier that sheds water away from the damaged area.
For a repair that blends in better with your roof, try this finishing touch: sprinkle matching granules over the wet sealant. You can collect these from your gutters during cleaning—they naturally wash off aging shingles. These granules help the repair blend in visually and provide some UV protection to the sealant, extending the life of your patch. It’s a small detail that makes a big difference in how professional your repair looks from the ground.
DIY Repair vs. Hiring a Professional Roofer
Learning how to repair blown off roof shingles yourself can save money, but it’s not always the right choice. The decision between DIY and calling the experts comes down to the amount of damage, your comfort working at heights, and your roof’s overall condition.
We’ve seen many homeowners successfully tackle minor shingle repairs. But we’ve also seen DIY attempts turn a small repair into a large problem. Understanding when to grab your tools versus your phone is as important as the repair itself.

When DIY is a Good Option
DIY repair is a great option for isolated damage on a low-slope, accessible roof. If you’re replacing just one or two shingles on an otherwise healthy roof and have the proper safety gear, it’s a manageable and cost-effective project. A successful DIY repair can last for years, provided the surrounding shingles are in good condition.
When to Call a Professional Roofer
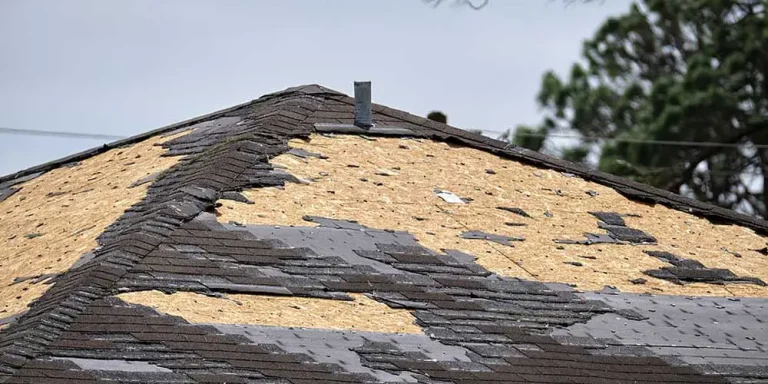
Some situations demand professional expertise. Call a pro if you see multiple missing shingles or large sections of damage, as this may indicate a deeper problem with the underlayment or decking.
Steep roofs and multi-story homes dramatically increase the risk of a fall. No repair is worth a serious injury, so if you have any doubts about your safety, make the call.
Red flags like sagging sections, water stains in your attic, or a roof over 15-20 years old suggest that patching may not be enough. These signs often mean a replacement is the smarter long-term investment.
For homeowners in the greater San Antonio, TX area, our team at Apex Roofing & General Contractors understands local weather challenges. We are certified and insured for every job, from minor repairs to full replacements.
A professional repair comes with a warranty on materials and workmanship, offering peace of mind a DIY fix can’t match. We work efficiently and ensure every repair meets local building codes, preventing future issues. When you’re unsure, a professional inspection is a small price to pay for certainty.
Proactive Roof Care: Prevention and Long-Term Maintenance
The best repair is the one you never have to make. Regular maintenance and inspections are your insurance policy against expensive surprises, catching small problems before they turn into major headaches.

How to Prevent Shingles from Blowing Off
Prevention starts with proactive care. To keep shingles from blowing off:
- Conduct biannual inspections each spring and fall to spot wear and tear early.
- Keep gutters clean to ensure proper water drainage. The National Weather Service offers tips to prevent ice dams, which are caused by poor drainage.
- Trim overhanging tree branches to prevent scraping and impact damage.
- Address minor issues like curled shingles immediately using the techniques in this guide.
- Ensure proper attic ventilation to prevent heat and moisture buildup that ages shingles prematurely.
- Invest in wind-resistant materials like architectural shingles when it’s time for a replacement.
Signs Your Roof is Nearing the End of its Lifespan
Every roof has a lifespan. Watch for these signs that yours is nearing retirement:
- Widespread curling, cracking, or bald spots from granule loss.
- Shingle tabs that are cupped or clawing (curling up at the edges or in the middle).
- Your roof is over 20 years old, approaching the end of a typical asphalt shingle lifespan.
- Extensive moss or algae growth, which traps moisture.
- Rising energy bills due to compromised insulation.
- Water stains in your attic or sagging spots on the roofline, which indicate serious issues.
For a thorough evaluation of your roof’s condition, consider a professional Roof Inspection Guide Near Me. Our team provides honest assessments to help homeowners make informed decisions.
Shingle Durability and Lifespan
Understanding your shingle type sets realistic expectations. Asphalt shingles, the most common type, last 15 to 30 years. Standard three-tab shingles are at the lower end of that range.
Architectural shingles are thicker, offer superior wind resistance, and can last 30 to 50 years. Their durability makes them a worthwhile investment in storm-prone areas.
Premium materials like slate, tile, or metal roofing can last 50 years or more but require specialized repair knowledge. Proper installation using quality materials suited to San Antonio’s climate is the key to a long-lasting roof.
Conclusion
Learning how to repair blown off roof shingles is an essential skill that protects your home from costly damage. With this guide, you can confidently tackle minor repairs, but it’s equally important to know your limits. There is no shame in calling a professional for extensive damage, steep roofs, or any situation where you feel unsafe. Your safety and your home’s integrity are the top priorities.
The team at Apex Roofing & General Contractors has years of experience helping San Antonio homeowners with everything from small fixes to major replacements. We understand our region’s unique weather challenges and ensure every job meets local codes with quality workmanship.
If you’re facing roof damage and need a reliable assessment, we’re here to provide an honest evaluation and clear options. We offer free estimates to help you make an informed decision. Call us at (726) 727-7663 for your free inspection today. Taking action, whether you do it yourself or trust a professional, is the best way to protect your home for years to come.