Why Commercial Rubber Roof Repair Matters for Your Business
How to repair rubberized commercial roofing starts with understanding that even the most durable EPDM rubber roofs can develop issues over time. Whether it’s a small puncture from debris, a seam that’s begun to separate, or blistering from UV exposure, addressing these problems quickly prevents water damage, protects your building’s interior, and avoids costly business interruptions.
Quick Answer: Basic Rubber Roof Repair Steps
- Inspect the roof for cracks, tears, blisters, or loose seams
- Clean the damaged area with EPDM cleaner to remove dirt and oxidation
- Cut an EPDM patch that extends at least 2 inches beyond the damage
- Prime the repair area and let it become tacky
- Apply the patch, pressing firmly from the center outward
- Roll the patch with a seam roller to eliminate air bubbles
- Seal all edges with EPDM lap sealant
For professional help with commercial roofing needs in San Antonio, trusted experts are just a call away.
EPDM rubber roofs are popular for commercial buildings because they’re durable, cost-effective, and can last 30 years or more with proper care. But weather, foot traffic, and age can all take their toll. Understanding how to repair rubberized commercial roofing empowers you to catch small problems before they become major headaches.
I’m Carlos Yzaguirre, President of Apex Roofing & General Contractors, and I’ve spent years helping San Antonio property owners protect their investments through expert how to repair rubberized commercial roofing solutions and preventative maintenance strategies. This guide will walk you through every step of the repair process, from inspection to final sealing.

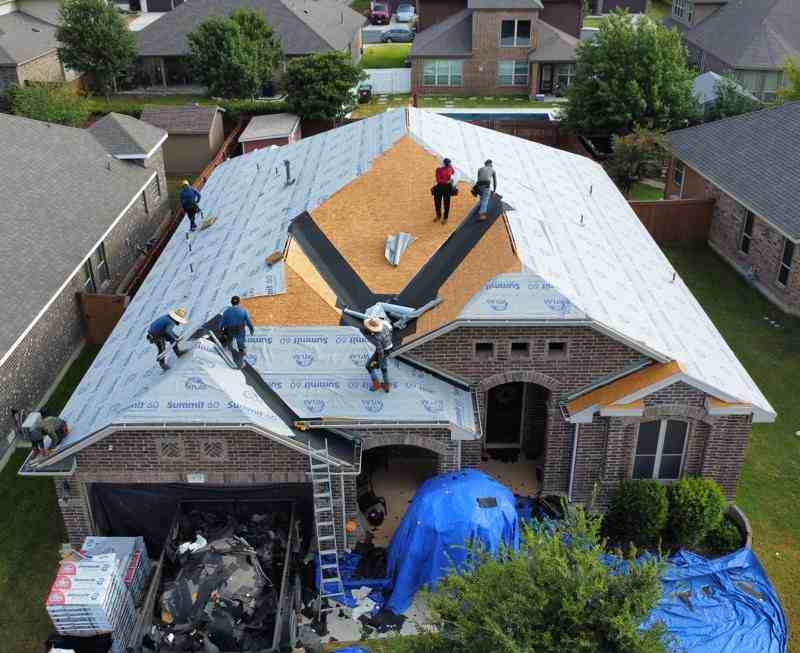
First Things First: Inspecting Your Rubber Roof for Damage

Before you can effectively tackle how to repair rubberized commercial roofing, you need to know exactly what you’re dealing with. A thorough inspection is the foundation of any successful repair job. Think of it like a health checkup for your building—catching small issues early prevents them from turning into expensive emergencies that could shut down your business for days.
EPDM roofs are built to last, often providing reliable protection for 30 years or more with proper maintenance. The key word there is “proper.” We recommend scheduling inspections at least twice a year—once in spring to assess any winter damage, and again in fall to prepare for colder weather. After major storms or extreme weather events, an additional inspection is always a smart move.
Common Causes of Damage
EPDM (Ethylene Propylene Diene Monomer) rubber roofing is remarkably resilient, but it’s not invincible. Understanding what typically goes wrong helps you know what to look for during your inspection.
Punctures and tears are among the most straightforward problems. Debris carried by wind, dropped tools during maintenance, or even careless foot traffic can create holes in the membrane. While EPDM is tough, sharp objects don’t discriminate. Larger tears often happen when high winds lift unsecured objects or when maintenance crews aren’t as careful as they should be.
Seam separation ranks as one of the most common culprits behind leaks. Over time, the adhesive holding those seams together breaks down from UV exposure and constant temperature fluctuations. When seams pull apart, water has a direct path into your building. It’s like leaving a window cracked during a rainstorm—eventually, water finds its way in.
Ponding water deserves special attention. Yes, EPDM is waterproof, but when water sits on your roof for more than 48 hours after rain, it puts unnecessary stress on the membrane and seams. Flat roofs are particularly vulnerable to this issue, and prolonged ponding accelerates deterioration in ways that can surprise even experienced property owners.
UV degradation happens slowly but surely. Years of constant sun exposure make the rubber brittle, causing it to crack and lose flexibility. Blistering occurs when moisture or air gets trapped beneath the membrane—when the sun heats these pockets, they expand into bubbles that eventually rupture. Shrinkage is another time-related issue where the membrane contracts slightly over its lifespan, pulling at seams and flashing details until something gives way. Research on EPDM membrane shrinkage has explored effective remediation strategies for this phenomenon.
Hail damage can be devastating, especially during severe Texas storms. Impact from large hailstones creates visible indentations, cracks, or outright punctures in the membrane. Studies on hail impact testing of EPDM roofs have documented the extent of damage possible from severe weather events.
Finally, poor installation is an unfortunate reality that causes premature roof failure. Improperly sealed seams, inadequate flashing, or insufficient substrate preparation create problems that might not show up for years—but when they do, they’re often extensive.
Signs Your Rubber Roof Needs Repair
Now that you know what causes damage, let’s talk about what to actually look for during your inspection. A trained eye can spot these warning signs and address them before they become costly disasters.
Visible cracks or splits are your roof’s way of waving a red flag. These are direct pathways for water infiltration and demand immediate attention. They typically result from UV degradation, thermal cycling, or physical impact. Similarly, bubbles or blisters indicate trapped moisture or air beneath the membrane. While they might not be leaking yet, they’re weak spots waiting to rupture.
Loose or peeling seams should set off alarm bells. When you see membrane edges lifting or separating from adjacent sheets, you’re looking at one of the most common sources of commercial roof leaks. This is where understanding how to repair rubberized commercial roofing becomes critical for your building’s protection.
The most alarming sign for any property owner is water stains on interior ceilings or walls. Here’s something important to remember: water is sneaky. It can travel a considerable distance through your roof assembly before showing up inside, so that stain on your ceiling might not be directly below the actual leak source. This makes tracking down the problem more challenging but absolutely necessary.
Don’t overlook your drainage system. Clogged drains or scuppers prevent proper water flow, leading directly to ponding issues. If you notice areas of standing water 48 hours after rain, your drainage is inadequate or your roof has settled in certain spots. This prolonged exposure to moisture is a recipe for accelerated deterioration.
Deteriorated flashing around vents or HVAC units creates open invitations for leaks. Flashing seals those critical transition points where your roof membrane meets penetrations like vents, pipes, skylights, and rooftop equipment. When flashing cracks, loosens, or deteriorates, water has an easy entry point into your building.
While not always a direct sign of membrane damage, mold or mildew growth indicates prolonged moisture issues that can lead to serious problems. If your EPDM roof has a granular coating, excessive accumulated granules in gutters signals an aging or deteriorating coating that needs attention soon.
A comprehensive inspection covering all these potential issues gives you the complete picture of your roof’s condition. Armed with this knowledge, you’re ready to move forward with repairs—or to make an informed decision about calling in professional help when the situation warrants it.
Gearing Up: Essential Tools and Materials for a Lasting Repair

When it comes to how to repair rubberized commercial roofing, having the right tools and materials isn’t just important—it’s everything. We’ve seen too many well-intentioned repairs fail simply because someone used the wrong product or skipped a critical step. Using incorrect materials, particularly asphalt-based products, can contaminate the EPDM membrane and lead to costly membrane replacement. The good news? With the proper equipment and EPDM-specific materials from reputable suppliers, you can achieve professional-quality results that last for years.
Essential Tools & Safety Gear
Before you climb onto that roof, let’s talk about safety. Working on a commercial flat roof presents real hazards, and we never compromise on this. Your safety harness is non-negotiable if you’re working near edges or on any roof with a pitch. Make sure your ladders are set up properly—the base should be one foot away from the wall for every four feet of height, with the ladder extending at least three feet above the roof edge.
Your non-slip work boots are equally critical. Rubber roofs can be surprisingly slick, especially when wet or covered with morning dew. We’ve all had that heart-stopping moment when our foot slips, and it’s not something you want to experience on a commercial building.
For the actual repair work, you’ll need a utility knife for cutting patches and trimming damaged areas, along with heavy-duty scissors that are ideal for cleanly cutting EPDM patch material and rounding those all-important corners. A stiff-bristle brush is essential for thoroughly cleaning the repair area and removing stubborn oxidation that can prevent proper adhesion.
Your paint roller with a medium nap roller cover will help you apply primer evenly across the surface. Don’t skip the seam roller—this tool is absolutely crucial for pressing down patches to ensure complete adhesion and eliminate any trapped air bubbles. A steel roller typically provides the best results. You’ll also need a caulking gun for applying lap sealant around patch edges and protective gloves to shield your hands from cleaners, primers, and adhesives.
Round out your toolkit with basic cleaning supplies like brooms, buckets, and perhaps a pressure washer (used carefully and at low pressure). Having clean rags or cloths on hand for wiping surfaces is also essential.
Necessary Repair Materials
The quality of your repair depends entirely on using EPDM-compatible products. This cannot be stressed enough—generic sealants and asphalt-based products will destroy your membrane over time.
Start with EPDM patch material or pressure-sensitive tape, which comes in various sizes and thicknesses. Pressure-sensitive patches have adhesive pre-applied, making them the go-to choice for quick, reliable fixes. You’ll also need EPDM cleaner or weathered membrane cleaner, specifically formulated to remove the carbon black film (oxidation) and dirt without damaging the membrane. Residue-free cleaners like Simple Green or Spic n’ Span can work in a pinch, but dedicated EPDM cleaners are always your best bet.
EPDM primer is essential for promoting strong adhesion between the membrane and your patch. This step prepares the surface to receive the repair and should never be skipped. EPDM lap sealant or caulk seals the edges of your patch, providing an extra barrier against water intrusion and preventing the patch from lifting over time.
Keep plenty of rags or clean cloths available for applying cleaner and wiping surfaces completely dry. If you’re using non-pressure-sensitive patch material, you’ll also need single-ply EPDM adhesive—not a general bonding adhesive, but one specifically designed for EPDM applications. Apply this to both the patch and the roof surface for maximum holding power.
Manufacturer-specific repair materials represent best practice in the industry. Cutting corners on materials is the fastest way to turn a small repair into a major headache down the road.
The Main Event: A Step-by-Step Guide on How to Repair Rubberized Commercial Roofing

Now we get to the heart of the matter—actually fixing that rubber roof. This is where precision and patience pay off. Rushing through any of these steps can compromise the entire repair, so take your time and do it right the first time. For a helpful visual reference that walks through each stage, check out this step-by-step EPDM rubber roof repair slideshow.
Step 1: How to Properly Prepare the Roof Surface Before Applying a Patch
I can’t stress this enough: surface preparation is everything. Even the highest-quality patch material will fail if it’s applied to a dirty or wet surface. Think of it like painting a wall—you wouldn’t paint over dirt and expect it to stick, right?
Start by clearing away any loose debris—leaves, dirt, gravel, or standing water. A good stiff broom works wonders here. Next comes the crucial step of removing the carbon black film that develops on aging EPDM membranes. This chalky oxidation layer acts like a barrier, preventing proper adhesion.
Apply your EPDM cleaner liberally to the damaged area and at least six inches beyond where your patch will extend. Using a stiff-bristle brush, scrub vigorously in circular motions. You’re not just wiping here—you’re actively removing years of weathering and grime. The membrane should look noticeably cleaner and slightly darker when you’re done.
After cleaning, wipe the entire area thoroughly with clean rags. Here’s where patience really matters: the surface must be completely dry before you proceed. Any moisture trapped under your patch will prevent adhesion and lead to premature failure. If there’s any doubt, wait. Work only on dry, calm days when you can be confident the surface will stay dry.
Step 2: How to Repair Rubberized Commercial Roofing with a Patch
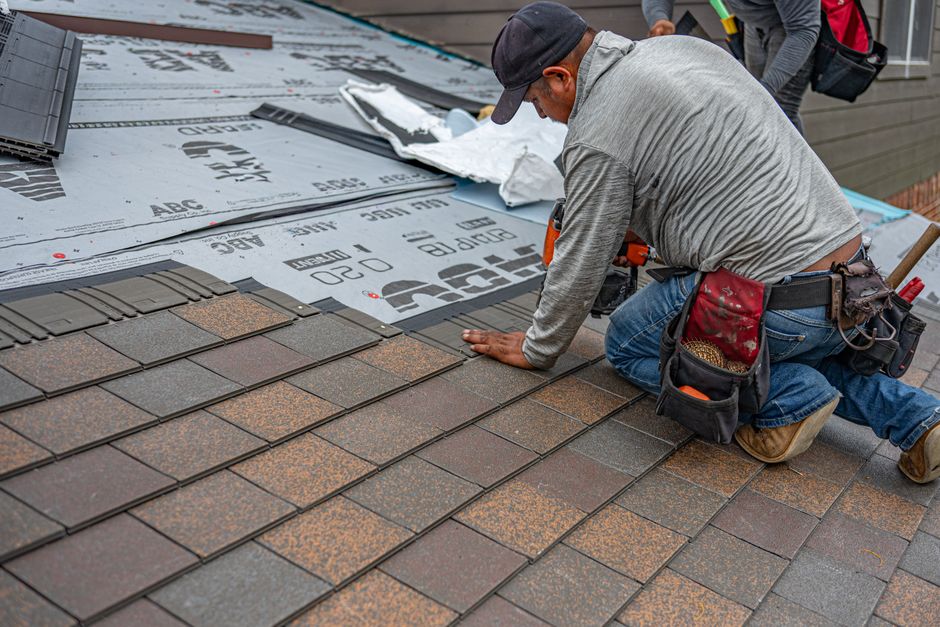
With your surface properly prepped, it’s time to prepare the patch itself. Measure the damaged area carefully—you want your patch to extend at least two to three inches beyond all edges of the damage. This overlap is what gives you a strong, lasting bond.
Cut your EPDM patch material to size using heavy-duty scissors. Here’s a small detail that makes a big difference: round all four corners of your patch. Sharp corners are prone to lifting over time, especially with foot traffic or wind exposure. Rounded edges create a more durable seal and are less likely to catch on anything.
Now apply EPDM primer to the cleaned roof surface where the patch will go. Use a paint roller with a medium nap cover for even application. The primer should extend slightly beyond where your patch edges will sit. This isn’t just a suggestion—primer is what chemically prepares the membrane to bond with your patch.
Let the primer become tacky—usually just a few minutes, but always follow the manufacturer’s specific instructions. The primer needs to flash off and reach that tacky stage, not remain wet. Touch it lightly with your finger; if it feels slightly sticky but doesn’t come off on your finger, you’re ready to proceed.
Step 3: Applying the Patch and Ensuring a Watertight Seal
The application method depends on whether you’re using pressure-sensitive or non-pressure-sensitive patch material. Pressure-sensitive patches have adhesive already applied to one side, protected by a release liner. Simply peel off the backing and carefully position the patch over the damaged area. Press it down firmly, starting from the center and working your way outward to eliminate any air bubbles.
Non-pressure-sensitive patches require you to apply EPDM adhesive to both the patch and the primed roof surface. Follow the adhesive manufacturer’s instructions carefully regarding application thickness and open time—the period you must wait before bringing the two surfaces together.
Regardless of which type you’re using, position the patch carefully before making full contact. Once EPDM adhesive bonds, it’s extremely difficult to reposition. Center the patch over the damage, ensuring your two to three inch overlap on all sides.
Press the patch down firmly, starting from the center and working outward in all directions. This technique pushes air bubbles toward the edges and out from under the patch. Any trapped air creates weak spots where water can eventually penetrate.
Next comes the seam roller—this tool is essential for proper adhesion. Roll over the entire patch surface with firm, even pressure, working from the center outward. Pay special attention to the edges, rolling them multiple times to ensure complete contact with the membrane below. A properly rolled patch should show no bubbles, wrinkles, or lifted edges.
Finally, apply EPDM lap sealant around all edges of the patch using a caulking gun. Create a continuous bead about 1/8 inch thick along the entire perimeter. Use your finger or a small putty knife to feather the sealant outward, creating a smooth transition from the patch to the roof membrane. This final seal provides extra insurance against water intrusion and helps prevent edge lifting.
The sealant needs time to cure—typically 24 to 48 hours depending on temperature and humidity. Avoid walking on the repaired area during this curing period. With proper application, your rubberized commercial roofing repair should provide years of watertight protection.
While these steps can guide you through a DIY repair, some jobs are best left to the professionals. If you’re dealing with widespread damage, multiple leaks, or simply want the assurance of an expert repair, we’re here to help. We offer free estimates for all commercial roofing services. Call us today at (726) 727-7663 to schedule a free inspection and protect your property.